Exploring the Suffolk Virginia Night Sky – Astronomy, Astrophotography, Telescopes, EAA – Planets and Stars and Nebula and Galaxies – Looking, Learning, Sharing… Let's see what we can see…
I have been using my Raspberry Pi setup with Astroberry to remotely control my gear for a few EAA observing sessions now and it has been working out great. The clear nights have been cold and since I can access and control things from the warmth of my office I end up spending a lot more time observing. In this post I’ll walk through how I use the INDI Web Manager on the Raspberry Pi to allow me to connect to my mount and cameras from KStars/Ekos running on my desktop PC in the office.
The other night while I was observing I tried to document my process. Not saying this is necessarily the only or best way to set this up but this is the way which has been working well for me. Always learning and looking for suggestions/tips/tricks so please if you have them leave them in the comments.
The way the software communicates, whether from my laptop or from my office PC, is basically this:
KStars -> Ekos -> INDI Remote Profile -> INDI Web Manager (Astroberry Device Manager) -> Devices/Drivers
KStars, Ekos, and the INDI Remote Profile are configured/running on my laptop or desktop.
INDI Web Manager (Astroberry Device Manager) and Devices/Drivers are connected to/running on the Astroberry Raspberry Pi.
Here is a quick rundown of my process to setup the gear, test/verify connectivity, focus and align, observe, and then shut everything down and pack up…
Uncover telescopes, remove dust caps and such, connect hand controller, dew heaters, cameras, etc
Connect USB for GPS, mount, and cameras to Raspberry Pi.
Power on Raspberry Pi, wait for GPS module to acquire a fix
Start the device profile from the Astroberry Device Manager web interface
Start KStars -> Ekos and start the remote Ekos profile and verify device connections to my laptop
Use the Celestron Hand Controller to start up the mount
Check camera focus and polar alignment
Disconnect and stop the Ekos profile on the laptop and set the mount to the Home position
Move inside where it is warm
Start KStars -> Ekos and start the remote Ekos profile and verify device connections to my desktop PC
Capture & Solve Sync Align, Observe, Image, Have Fun
When I am done for the night. Disconnect and stop the Ekos profile on my desktop PC
Stop the device profile from the Astroberry Device Manager web interface
Shutdown the Raspberry Pi
Disconnect devices, install dust caps and such, cover telescope
Those are the steps. Now to dive into my process with a bit more detail…
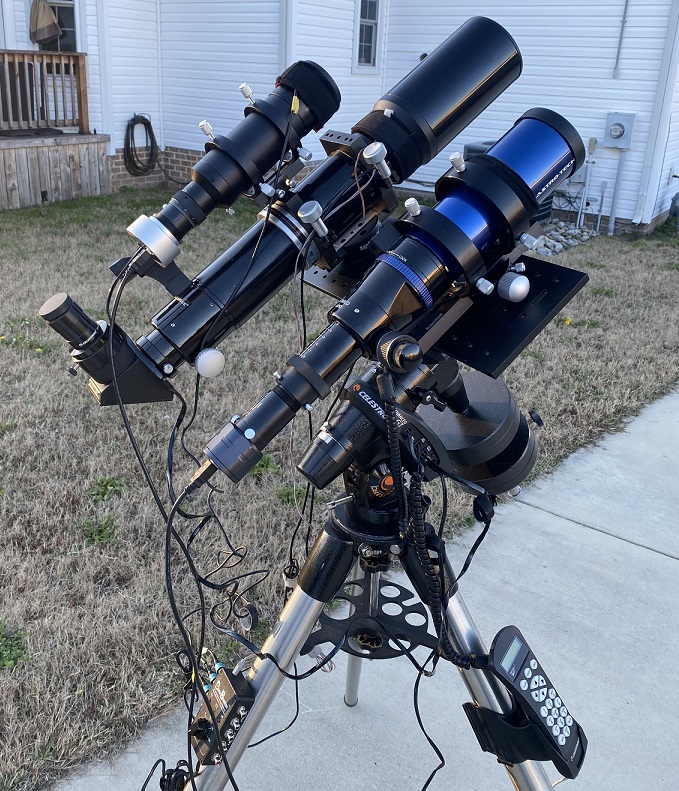
I uncover the telescopes, remove all the dust caps, and connect up all the stuff (cameras, dew heater, power cables, etc). Currently I have my AT66ED as my primary scope, my Stellarvue 80mm, and the SVBONY SV106 for a guide scope all riding on my Celestron CG5 mount. I install the SV305 Camera on the AT66ED and the Orion SSAG camera on the SV106 guide scope. I usually get everything uncovered and connected while the Sun is still up.
I may take the Stellarvue off the mount at some point, it is there for visual observing but since I am now mostly observing via EAA in my office it is not being used. I am leaving the Stellarvue on there for now mostly cause everything is balanced and I am lazy. Before I remove it, I’ll likely have a go at attaching the SV305 to it and see what kind of results I get through it.
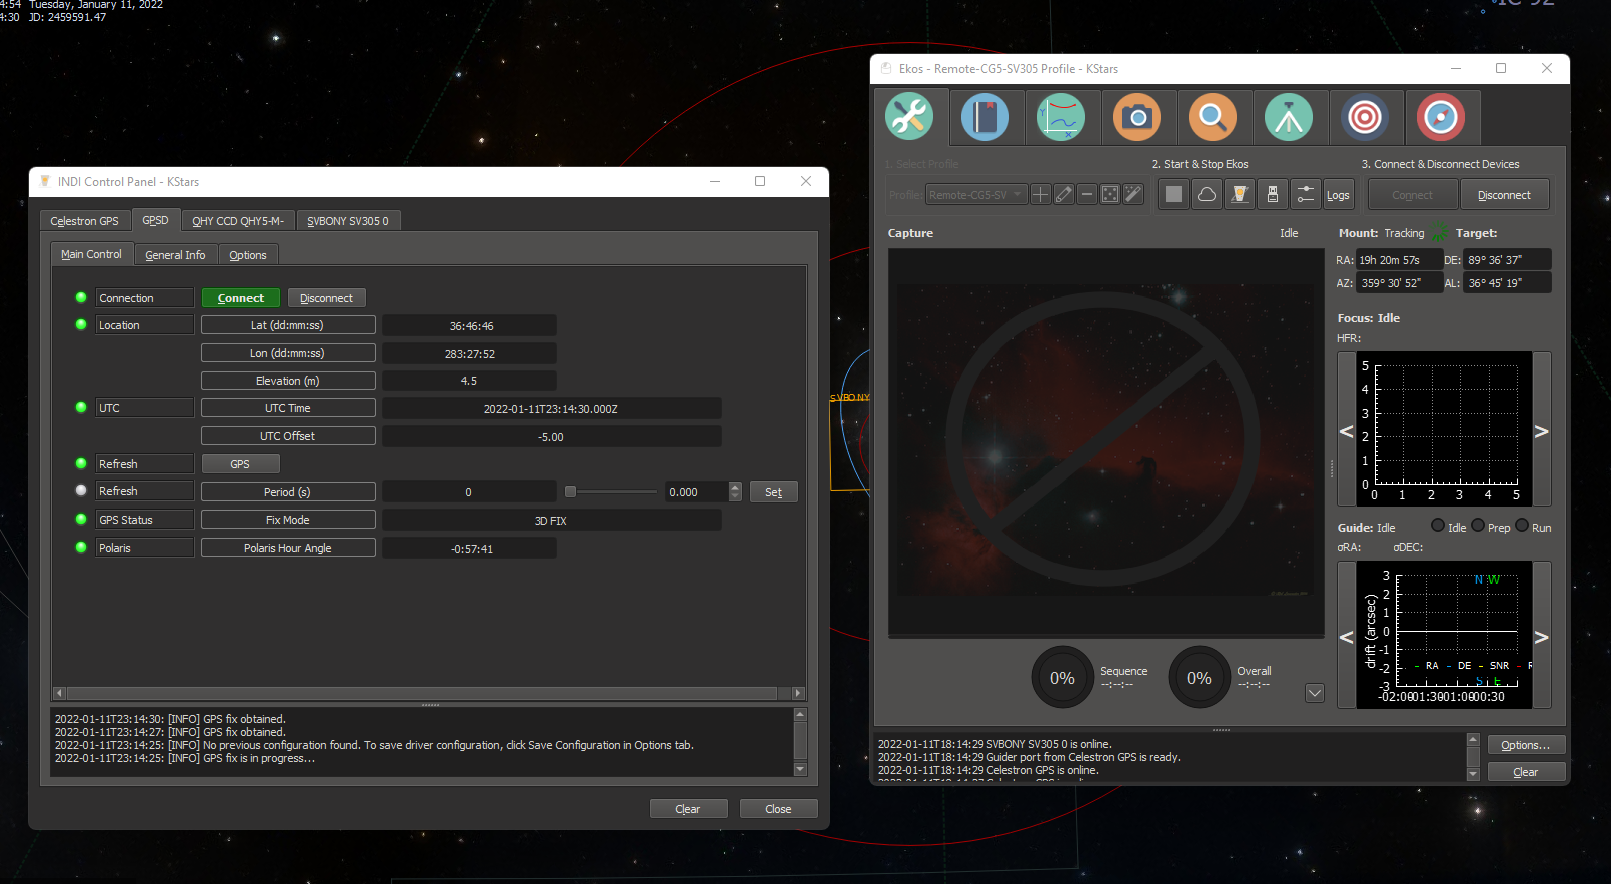
I connect the GPS module to a USB port on the Raspberry Pi. Connect the serial cable on the hand controller to the USB to serial adapter then to a USB port on the Raspberry Pi. Then connect up my SV305 camera and the Orion SSAG to USB ports on the Raspberry Pi. With everything connected I power on the Raspberry Pi. I watch the GPS module and wait for the red LED to start blinking so I know it has acquired satellites and is getting valid GPS data.
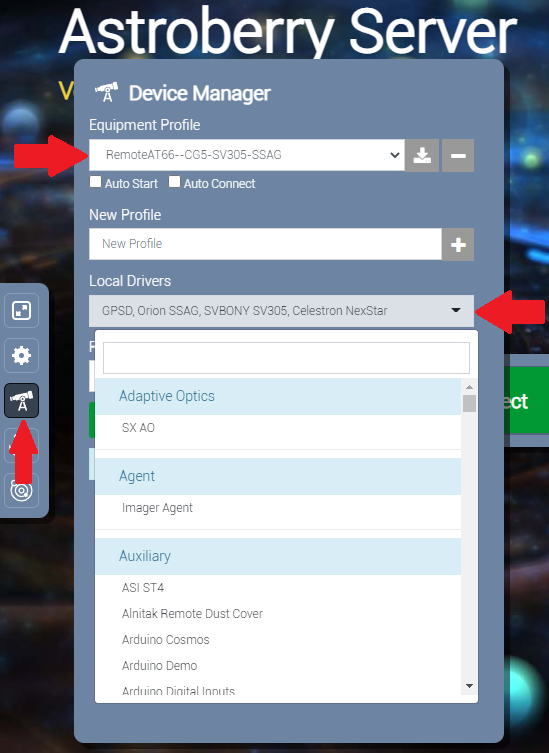
From my laptop I use a web browser to access the Astroberry Server (http://ip_address_of_astroberry/desktop) running on the Raspberry Pi and select the Device Manager Icon which opens the Astroberry interface to the INDI Web Manager. I have a profile I created with the Local INDI Drivers for GPSD, Celestron NexStar, SVBONY SV305, and Orion SSAG selected. You can use the drop down list to select other local drivers to add to the profile or you can create a new profile and add drivers from here as well.
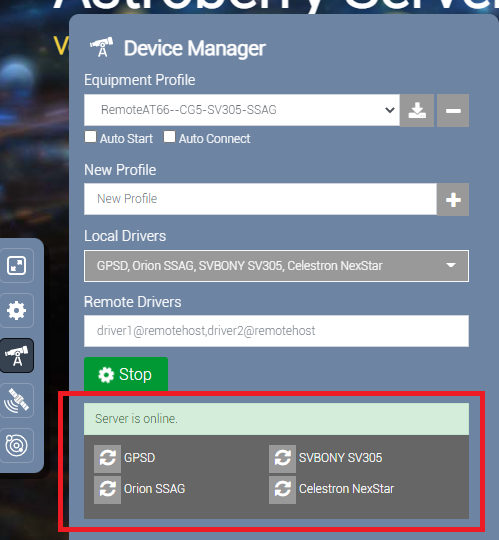
I select the profile I want to use and make sure the local drivers for the gear connected are selected, and click Start. The server should come online and the devices which are configured should show running on the screen.
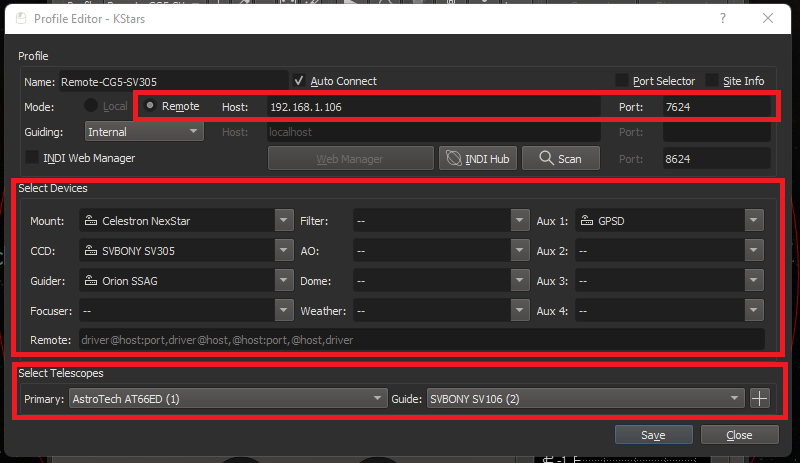
On the laptop I then launch KStars -> Ekos. I created a remote profile in Ekos with the IP address and device manager port. I configured the remote mount, camera, and GPS. Then configured the telescopes. Configuring the Telescopes correctly (aperture and focal length) is important as it is used in calculating the FOV which is used for plate solving.
I start the profile and verify the devices all connect. I am doing this from my laptop, outside with the scope, to make sure things are working and to get the mount started before I move inside to the office. Keeps me from running in and out if things are not working correctly.
To start up the mount, I make sure the mount is in the Home position by lining up the arrows on the mount. On the Celestron Hand Controller I hit Enter to start the alignment process, hit Enter to confirm I have the mount in the home position, verify the time is correct (it should be getting it from the Raspberry Pi) and hit Enter, then select Quick Align from the alignment menu and hit the Align button. After a couple seconds the LCD on the hand controller reads Alignment Success and the mount is ready.
I slew to a bright star (either with KStars or with the hand controller) and use Ekos to capture a couple of images to check my focus and adjust if necessary. If I want to run the Ekos Polar Alignment routine, I’ll run it now since I need to be outside with the mount to make any adjustments. The Ekos Polar Alignment is really easy to do, but that’s another post.
Once everything is up, focus is good, I have done/checked my polar alignment, and I am confident things are working as they should, I disconnect and stop the Ekos profile on the laptop. If I have moved the scope any I use the hand controller to put it back in the home position (Menu->Utilities->Home Position->Goto).
The Device Manager profile on the Astroberry web interface will stay running. Now I can move inside where it is warm. 🙂 I don’t have to disconnect from the laptop, I could just carry it inside and continue with observing from it, but my monitor on my office desktop PC is much larger and easier to see.
When I am inside at my desk I launch KStars -> Ekos on my desktop PC. I select a remote profile I created (same as the one I have on the laptop), start it, and make sure all the devices (mount, cameras, GPSD) connect.
I can now select an object I want to observe in KStars, right click and select the Celestron GPS, then click Goto to slew to the selected object.
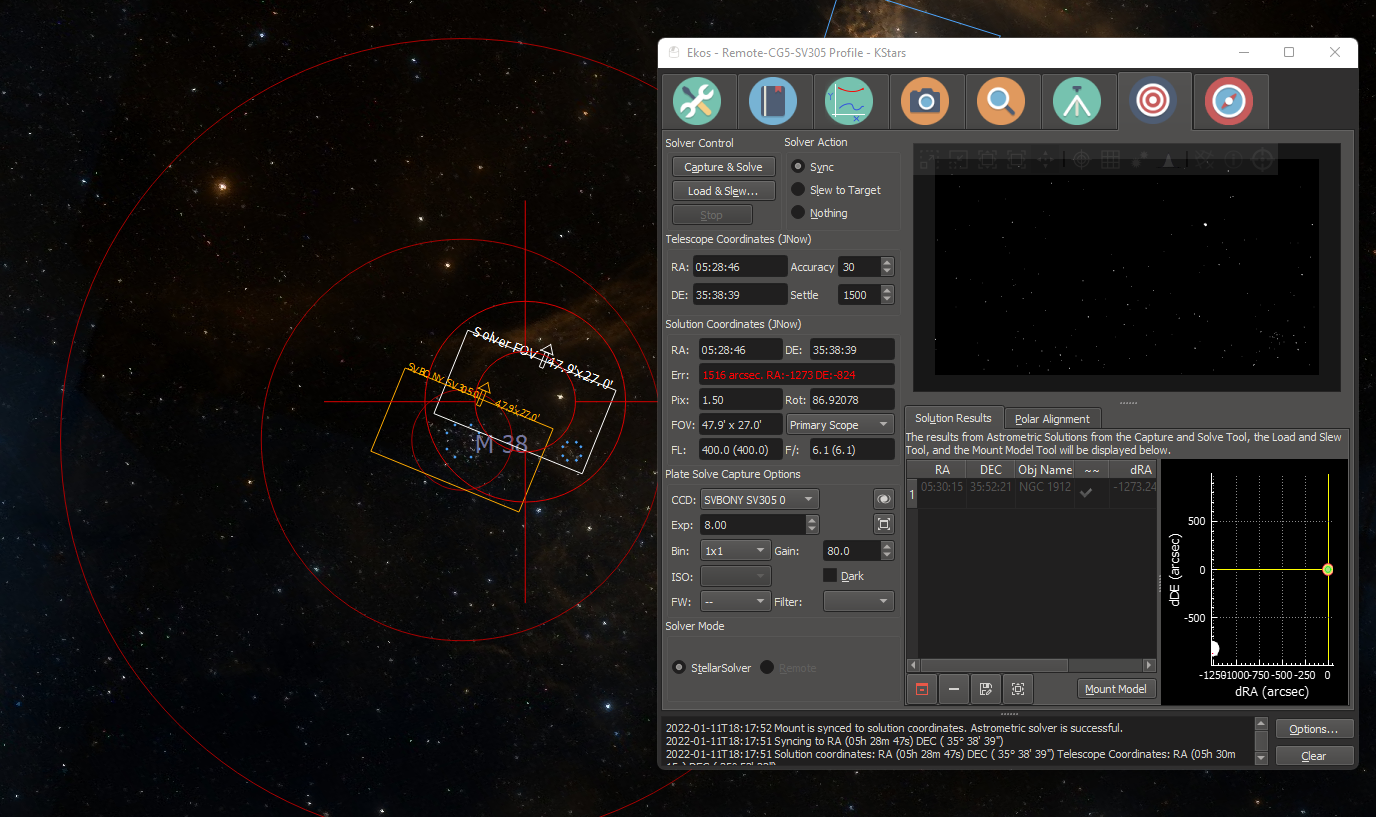
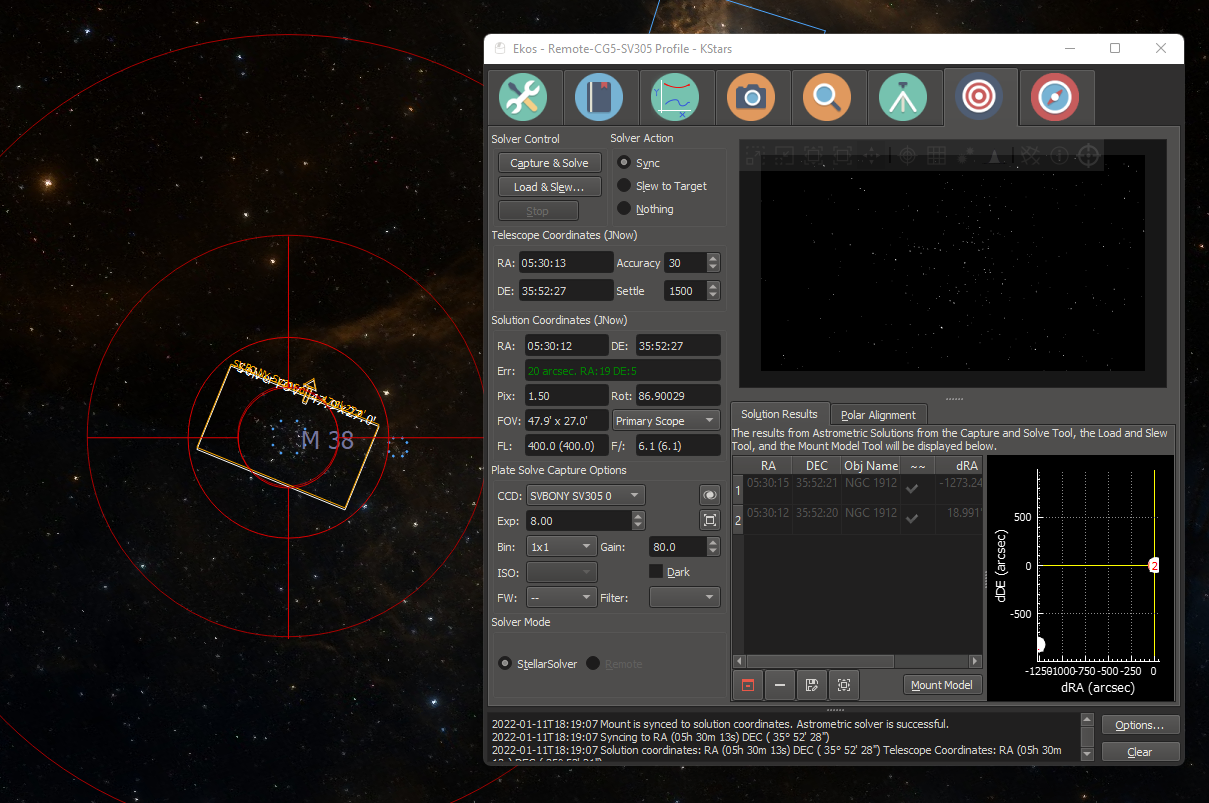
From Ekos Align I run a Capture & Solve with Sync as the action. I can verify plate solving is working, sets up my camera FOV, and shows me how well I am aligned. Sometimes the Capture and Align shows me dead on, sometimes I have to do a second slew, Capture & Align with Sync to get me dead on.
The screenshot below shows my alignment off after I did a Goto to M38 and ran the Capture & Solve with Sync. The orange rectangle is the FOV of the camera where the scope thinks it is pointing, the lighter rectangle is the FOV of the capture and solve (where it actually is pointing).
In KStars I right click the same object (in this case M38), select the Celestron GPS, and Goto the object again, the scope slews off the object and then back on. I run Capture & Solve with sync and the two FOV rectangles overlap each other, we are dead on.
Now I can browse around the sky and view live stacks of objects using SharpCap Pro (another post on how I do this coming soon) from the comfort of my office.
Once I am finished observing I disconnect and stop the Ekos profile on my desktop PC. From a web browser I access the Astroberry Server (http://ip_address_of_astroberry/desktop) and go to the Device Manager. I then stop the running profile by clicking the Stop button. I can now shutdown the Raspberry Pi and go out into the cold to pack away my gear.
Eventually I want to test this access with a buddy down the street. Basically let him run KStars and use an Ekos profile to connect to, and control, my gear over the Internet. That will be pretty neat. For now just connecting to my desktop PC is making me pretty happy 🙂 but it might be pretty cool to share out my gear.
Leave a comment if you have any questions about setting up Astroberry Server, KStars, Ekos, or INDI. Also I am still learning so if you are doing something similar and have a tip or trick please leave it in the comments.