This post covers polar alignment (What and Why) and the process I use (How) to accurately polar align my Celestron Advanced GT equatorial mount using Ekos for EAA observing. The details of the process will vary for different mounts and different EAA software, but the concepts should be the same. If you have any tips/tricks for polar alignment, any questions about my process, or if you find inaccuracies in the post please let me know in the comments. I will update this post as I learn more.
Polar alignment is aligning the rotational axis of a telescope’s equatorial mount with a celestial pole to parallel Earth’s axis. Why would you want to do that? On a motorized equatorial mount the motors use sidereal time tracking to match Earth’s rotation. When tracking, the scope is not tracking an individual object, the mount motors are moving the scope in sync with Earth’s rotation, in relation to the distant stars, which keeps an object centered in the field of view (FOV).
When using a GoTo telescope and you GoTo and sync on an object, the mount basically knows this is where it needs to be, on sidereal time, and to stay there it will sidereal track to keep on target. This tracking works best if you have a level mount and an accurate polar alignment.
If you are a visual observer using a motorized equatorial mount an inaccurate polar alignment can be seen when an object you are viewing drifts off of center or out of the eyepiece FOV. Misalignment becomes more evident at higher magnifications. The same thing happens with EAA where a camera is replacing the eyepiece.
Here is an example of an EAA live stack of 50 x 5 second exposures of M31 with a bad (really terrible, like 6 degrees off) polar alignment. With the polar alignment so far off you can see how far it drifted over the course of just 250 seconds.
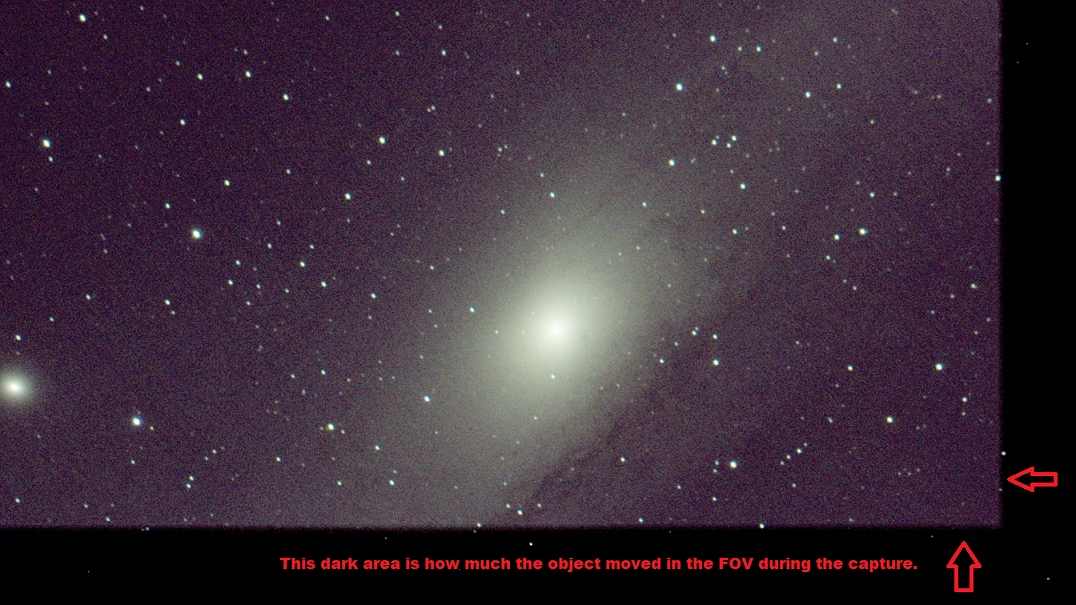
The image is drifting in the FOV up and to the left with each stack. The stacking program, in this case live stacking with SharpCap Pro, is still able to align and stack images but as more time passes the image will continue drift further out of the FOV. You may also notice that the stars are not really nice and round and these are just 5 second exposures. With the alignment off this much if I did 10 or 15 second exposures you would definitely see the stars become very oblong or probably even creating trails, and I doubt the stacking software would be able to resolve stars enough to stack them so it would start dropping frames.
Does the polar alignment have to be perfect? Well no, yes, kind of – really depends on what you are trying to accomplish. With EAA the exposure times are much shorter, seconds up to a minute or so, compared to the exposure times for astrophotography, 5/15/30 minutes or more, so the polar alignment does not have to be quite as precise with EAA. Live stacking software can handle most of the drift (that is one of the functions of stacking), but the better the polar alignment the longer the exposures and the better the captures/live stacks will be (no drift in the frame, round stars, no or fewer dropped frames, capture fainter objects, and resolve more detail). When doing long exposure astrophotography having an excellent polar alignment is critical. With my EAA observing I typically try to get my polar alignment at least within a few arc minutes of perfect (EAA software actually makes this really easy but more on that in a few).
Here is an example of a live stack of M77 and NGC1055 with the polar alignment pretty well dialed in (not perfect but very close, probably as close as I can get with the adjustments on my mount).
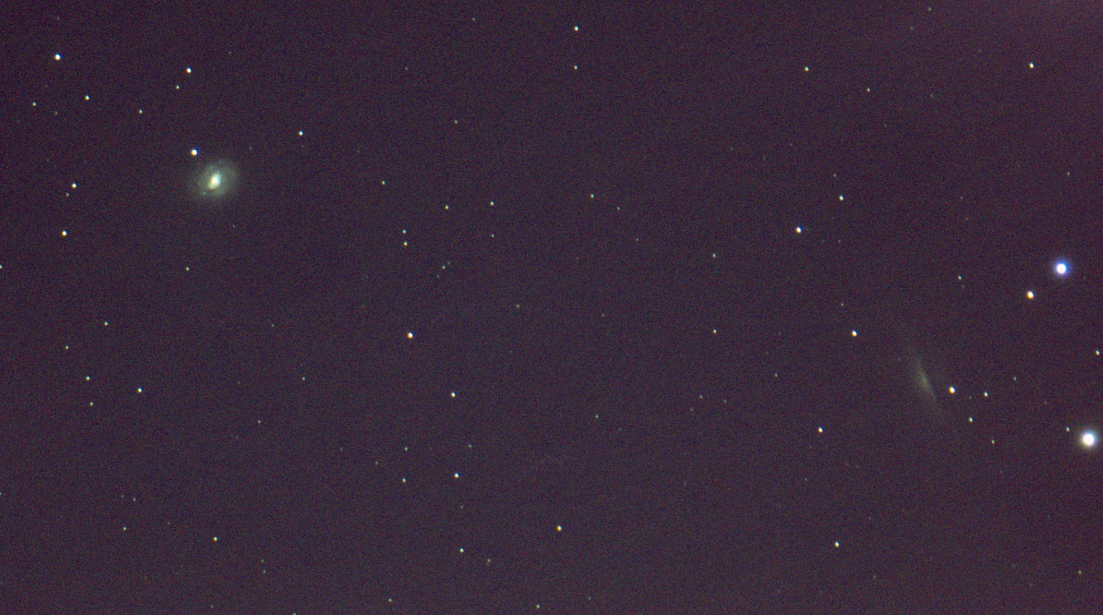
These are longer exposures, 15 seconds, over a longer period of time, 750 seconds, and the stars are nice and round. With the way I have M77 (upper left) and NGC1055 (lower right) positioned in the FOV, if the image drifted as much as in the above image of M31, then over 750 seconds M77 would have likely drifted out the frame.
What about autoguiding, do you still need a good polar alignment? Yes! Autoguiding can definitely help correct for issues such as: errors in the mount gears, minor misalignment due to coarse adjustments on the mount, equipment not perfectly balanced, not perfectly level, etc, but the better the polar alignment the better the autoguiding. Unlike sidereal tracking, autoguiding is taking images and tracking an object to send corrections to the mount when the object drifts in the FOV. A good polar alignment makes it much easier for the autoguider to provide accurate guiding. If the mount is way out of alignment then the autoguiding software will end up overcorrecting causing it to chase or lose the object it is guiding on which usually makes things even worse. With a good polar alignment autoguiding is not really necessary for EAA observing using exposures of 30 seconds or less.
To polar align an equatorial mount the Right Ascension (RA) axis of the mount is aligned with the celestial pole. Since I am in the northern hemisphere I can use Polaris, the North star, which circles the celestial pole. Centering Polaris in a polar scope will give me a really rough polar alignment. With the Right Ascension (RA) axis centered on Polaris I am basically going to be at least 3/4 of a degree (45 arc minutes) off the celestial pole. This may be good enough for visual observing and for some EAA exposure lengths (15 seconds or less, 30 seconds would be pushing it), but we can do much better (within a few arc minutes, or even a few arc seconds).
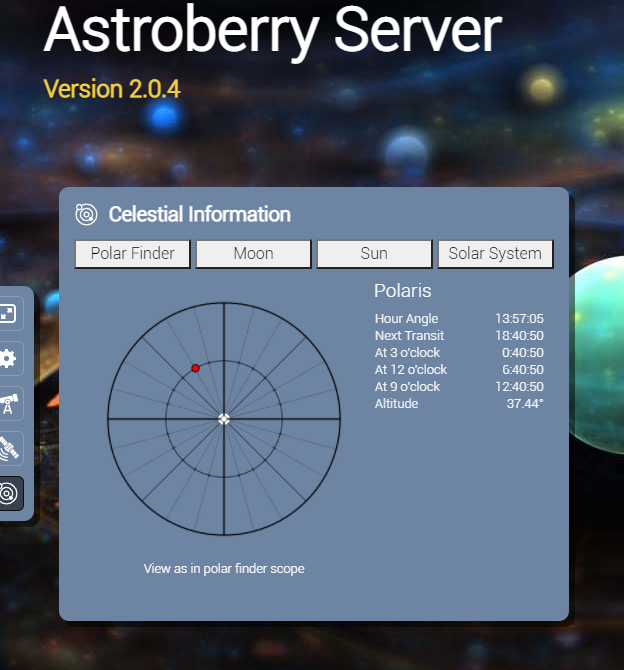
Polar scopes usually have a reticle to help get Polaris in the correct position for a more accurate alignment. The proper position to place Polaris in the polar scope depends on the date/time. Astroberry Server has a Celestial Information section in the web interface which displays where Polaris should be positioned in the polar scope based on the current time and location for a more accurate polar scope alignment.
There are a several other methods, besides using a polar scope, to get a good polar alignment which include the drift method, software plate solving, and purpose built polar alignment cameras. Since we are talking EAA here I am going to walk through using the plate solving method with EAA software. Software using plate, or Astrometric, solving can take several images, plate solve them, and calculate the misalignment then guide you through making adjustments to get a good, within less than an arc minute, polar alignment even if you are not able see Polaris. There are a lot of EAA software packages (SharpCap Pro, NINA, KStars/Ekos, PHD2, etc) which include functions, using either plate solving or the drift method, to assist with polar alignment. I use KStars/Ekos for my EAA observing and this is the process I use when setting up my telescope and getting a good polar alignment on my Celestron Advanced GT mount using Ekos.
Here is a quick summary of my polar alignment process:
- Setup, level, and balance the mount with the RA axis pointing North.
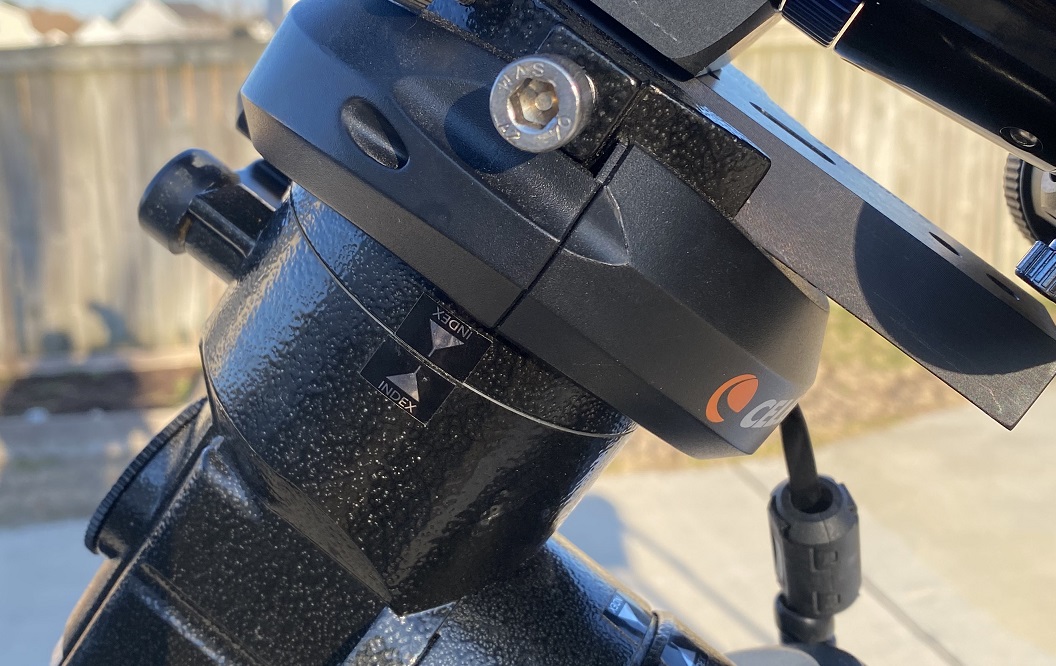
- Make sure the mount is in the Home position using the index marks on the RA axis and Dec axis.
- Power on the gear and the mount.
- Launch KStars/Ekos and start the Ekos profile. Verify INDI connections to mount, camera, etc.
- Initialize the mount with the hand controller (quick align).
- Disconnect and reconnect the mount in the INDI Control Panel
- Check focus and test plate solving, then return the mount to the home position using the hand controller.
- Run the Ekos Polar Alignment utility.
- Make necessary adjustments for an accurate polar alignment.
There are likely other ways (maybe even easier ways) but this is the process which works well for me. From set up to polar aligned it usually takes me about 20 minutes or so. Here is my process in more detail:
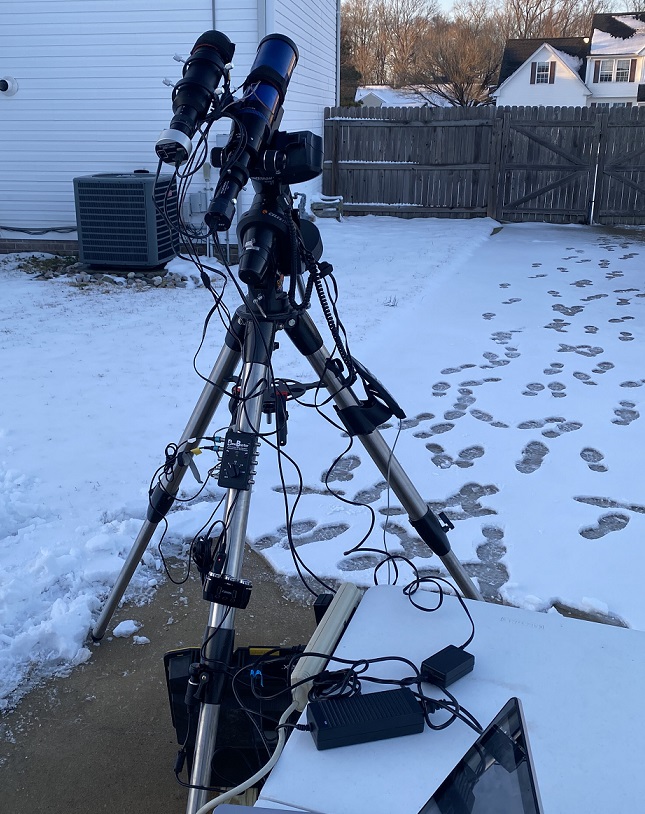
I set up the mount facing North. I use a compass and move the tripod to get the RA axis of the mount pointing North. Then I level the mount. On the Celestron Advanced GT CG5 there is a bubble level in the base to assist with this.
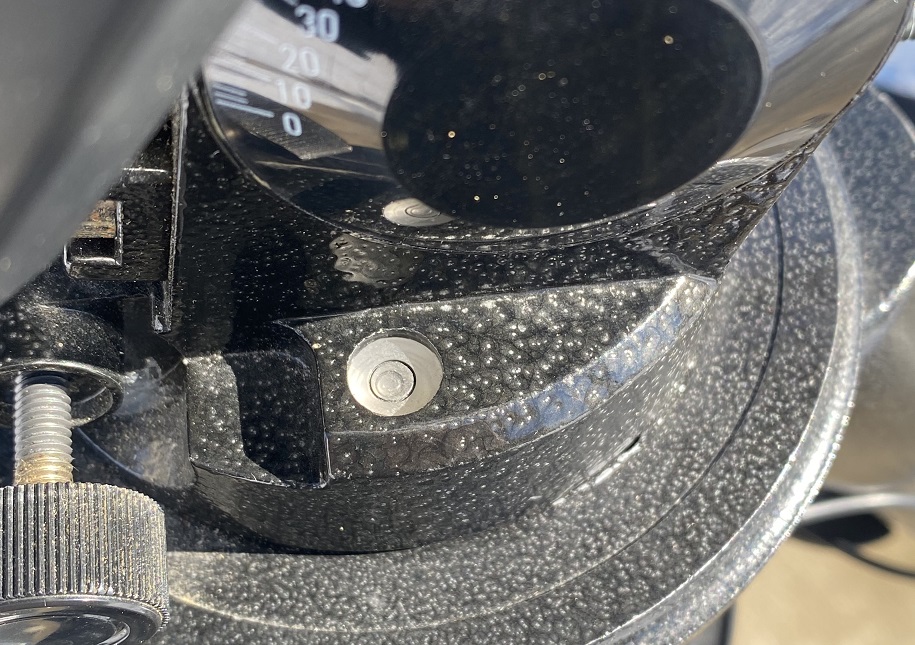
I adjust the tripod legs to get the bubble as close to the center of the circle as I can. Once the mount is level I check the balance of my gear (make sure all the gear – scopes, cameras, etc – is loaded up on the mount before balancing) and adjust as needed. Then recheck the level on the mount.
After dark I will sometimes use the polar scope to dial things in a bit, but mostly I just rely on the Ekos polar alignment utility. I can usually get it close enough with the compass and knowing how my mount needs to be oriented where I am observing from (it’s pretty much the same every time) for Ekos to be able do it’s thing. If I am at a location other than my usual site in the backyard I can use the polar scope to get me roughly aligned on Polaris (if I can see it).
I release the clutches on the mount and set the RA and Declination (DEC) axis to the Home position. On the Celestron Advanced GT mount there are index marks (stickers) which I align to do this.
Now to power on the mount and connect up everything through Ekos/INDI (how I connect up the mount and cameras remotely with Ekos/INDI can be found in this post) and verify the mount and cameras are connected. To do the polar alignment I need to be at the scope to make the adjustments so I usually do this on my laptop.

On the Celestron hand controller I validate the time and do the Quick Align to start up the mount. In the INDI Control Panel I disconnect and then reconnect the mount to make sure tracking is enabled. I use the hand controller to slew to a bright star to check the focus on the camera since decent focus is required for plate solving. I usually run a Capture and Solve with Sync before starting the polar alignment utility to make sure plate solving is working. How ever I move things around I put the mount back into the home position, with the hand controller, before starting the polar alignment in Ekos (important to note if the clutches are released to move to the home position I will have to restart the mount and the Ekos profile). There is a routine on the Celestron hand controller to return the mount to the Home position, on my controller it is under Menu -> Utilities -> Home Position -> Goto.
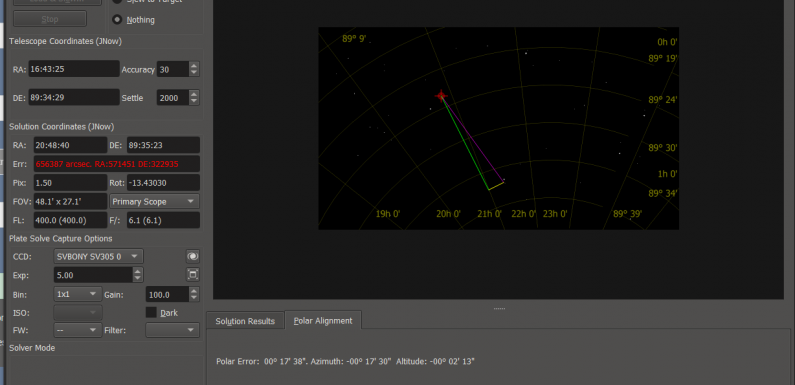
In the Alignment Tab in Ekos select Polar Alignment and set the exposure length, gain, direction, and slew speed. The settings I typically use are 5 seconds for the exposure length, 100 for the gain, the direction is set to west, and the speed is set to 8x.
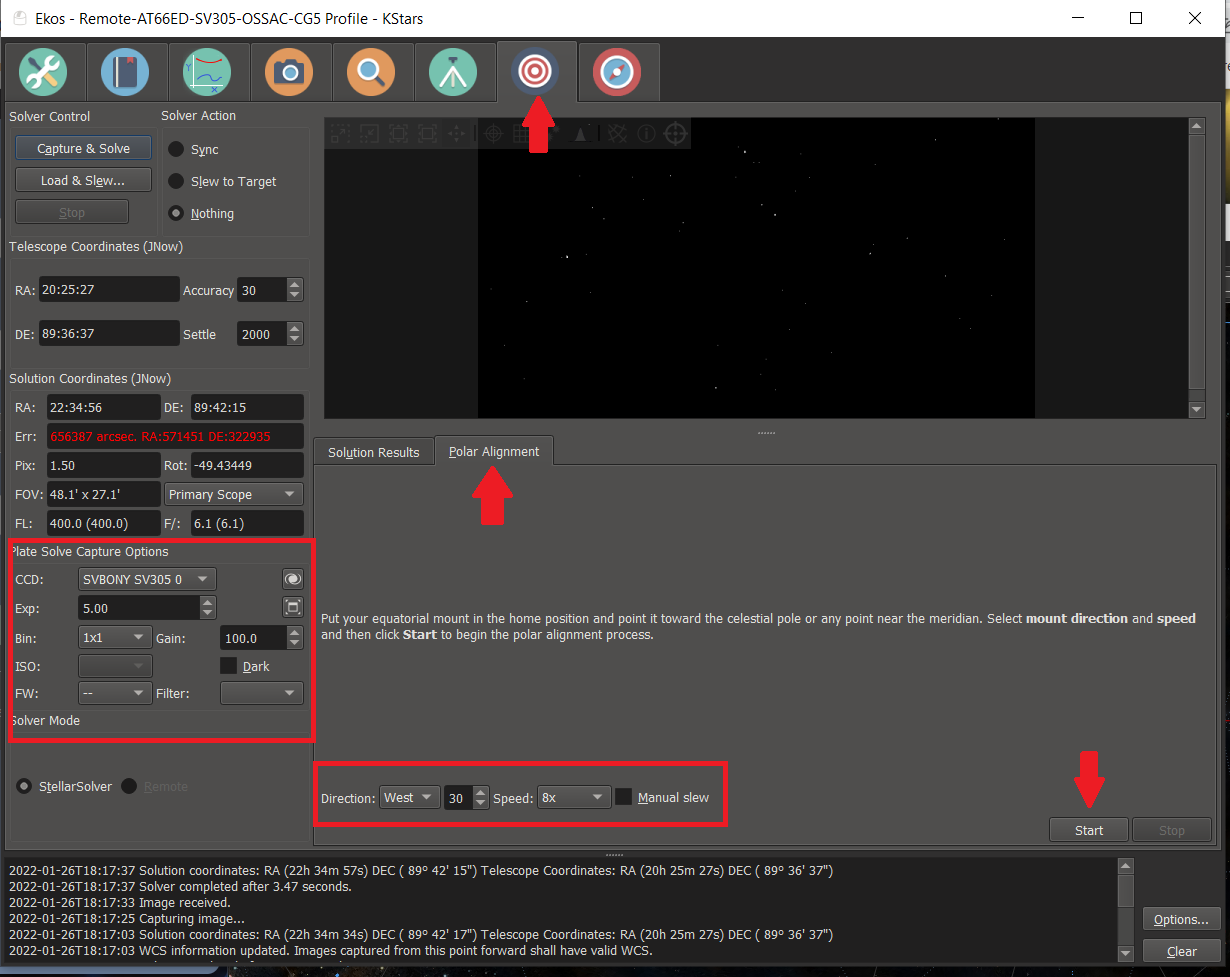
Once I have the settings set, I click Start. Ekos captures an image in the Home position and plate solves it, it then moves the mount on the RA axis and captures a second image and plate solves it, it moves the mount on the RA axis a final time and captures a third image and plate solves it. Once Ekos has captured and solved the 3 images it calculates the polar misalignment.
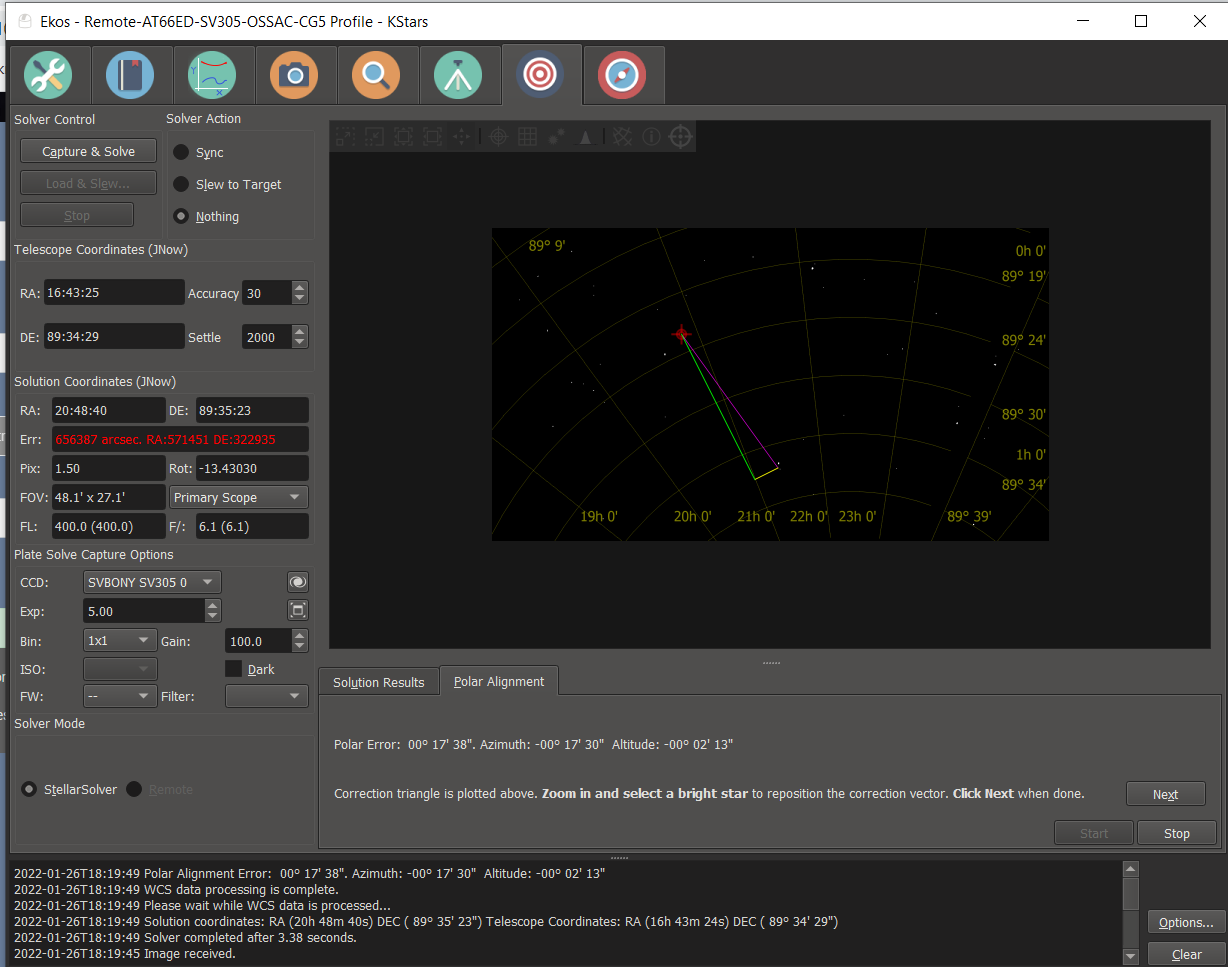
Zoom in on the image and select the brightest star which still keeps the adjustment lines within the image FOV. This will move the adjustment lines (the altitude line is yellow and the azimuth line is green) to the selected star. Click Next and set the Refresh interval (keep it a 1 second if possible, but if the stars are not bright enough I adjust it). Click refresh and the image will update so you can see the stars move as adjustments are made to the mount.
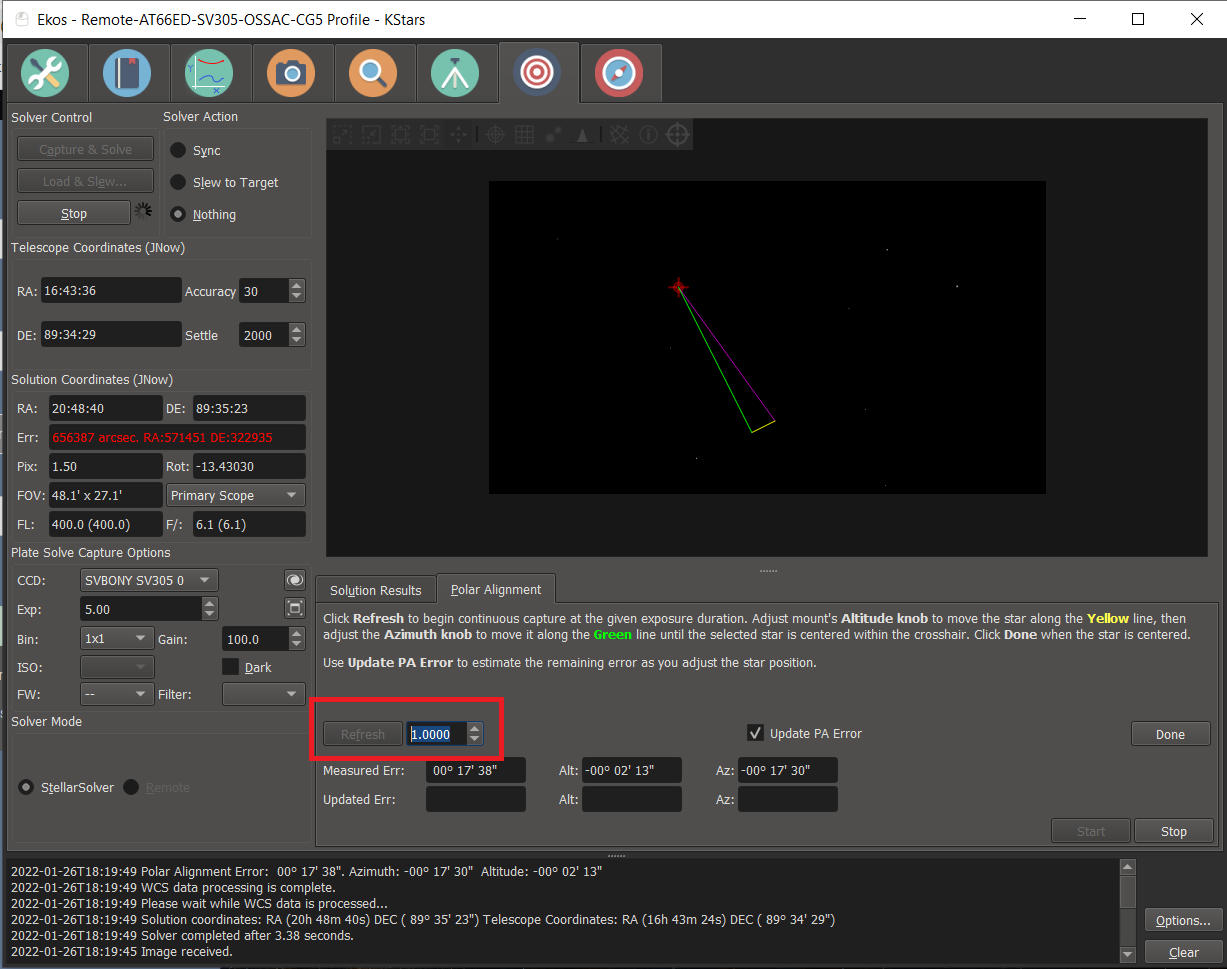
I start making adjustments on the mount. First adjusting the altitude, up or down, (yellow line) and then the azimuth, left or right (green line) to get the selected star to the point of polar alignment at the end of the purple line. Ekos is suppose to update the PA error as it refreshes when you make adjustments, but for some reason this is not working (not really sure why not). I just have to follow the star on the lines.

The adjustment screws on my mount are pretty coarse, so I cannot expect to get a perfect alignment but if I take it slow, making minor adjustments, I can get pretty close. If the alignment is way off (more than a degree or 2), and the polar alignment point is off the image, I will make adjustments to move closer to alignment. Then use the hand controller to reset the mount to the home position, and rerun the Ekos polar alignment routine again, and make more adjustments until I get a good polar alignment.
Yes this process can be somewhat tedious, but the quality of the EAA captures (and the reduced frustration from failed stacking) makes it worth the time and effort. The good news is once the mount is polar aligned it should stay that way unless you bump a tripod leg or move the mount. If you leave your gear set up this process does not necessarily need to be done before every observing session. I run the polar alignment utility whenever I first set up my gear, then I usually run the utility every few observing sessions just to check it, or I run it if I happen to notice my live stacks are drifting.
A good polar alignment not only improves image capturing it also makes GOTOs more accurate. I can spend more time observing and less time trying to get an object centered in the FOV.
I hope you found this information useful. If you have any questions or tips/tricks for getting a good polar alignment please post them in the comments.


Brilliant article, well formatted and easy to follow. I’m fairly adept at PA my HEQ5 Pro with KStars/EKOS, but you’ve confirmed for me that I need to star-align BEFORE PA – which is why PA failed to plate solve for me recently. Reckon I’ve been getting away with it for some time!
Interesting that you connect the hand controller to do star alignment. I use the star alignment in “Mount Model” on the “Alignment” module. I have two stars already pre-configured (Vega and Arcturas), press go and it’s done after a couple of minutes. It uses plate solving along with “Slew to Target” and gets within a few arcseconds of each target.
Cheers,
Ian
Ian,
Thanks for stopping by. I have to connect the hand-controller since I was using an older CG5 mount. I recently picked up a EQ6-R Pro which does not require the hand-controller. With the CG5 the alignment has to be done in order to start tracking on the mount. This is not the case with the EQ5 or EQ6. Instead of doing a star alignment you can do a solve and sync once you have un-parked the mount. You should then be able to run the Ekos Polar Alignment routine to dial in your alignment.
Hope that helps.
Thanks
Hersey