I have two Celestron Advanced GT CG5 mounts. One I obtained new when I purchased my Celestron 8″ SCT and the other I picked up used. These mounts have served me well and I have had a lot of fun observing with them. I did a basic tune up on the used mount way back in the day (probably in 2009 or so) and I figured it would be worth going through it on both the original new mount and the second hand mount. Going to rebuild both mounts, clean them up, re-grease them, and replace the worm gear and RA bearings, replace the nylon spacers with PTFE spacers, and adjust everything. This post is does not cover the step-by-step details of the process, it is more an overview (with some details here and there) of refreshing my CG5 mounts.
The Celestron Advanced GT CG5 Equatorial Mount is a great mount (IMHO). Yes it was/is an entry level mount but it has a 30lb payload and was packaged with the Celestron 9.25″, 8″, and 6″ SCTs (probably others) back in the day. Even though it is not produced any more there are still a lot of them out there. Mine have always worked great for my observing and imaging and continue to work great for EAA.
Both of my mounts are well over 10 years old (probably closer to 15). To tell you the truth I can’t tell the difference between the one I got new and which was the one I picked up second hand. So I am just going to start with tuning up the one I am currently not using then swap it out and do the one I am using.
I am doing this more as a maintenance activity than for a performance improvement. I am not expecting miracles but I am sure these old CG5s have many hours of observing left in them. If they happen to move a little smoother or track a little better, then that’s a bonus. At some point I will probably end up replacing at least one of my CG5s with something a little more robust, I have been looking at the Sky-Watcher EQ6, but that will be down the road a bit.
Here are a couple of great resources for rebuilding and tuning (which are more step-by-step) a Celestron CG5 mount:
- Celestron Advanced GT CG5 Tuning Tips on Cloudy Nights
This is where I found the information on replacement bearings. - Astronomy Boy CG5 Mount
- DIY Hypertune of a CG-5 Go-To Mount
When I “tuned” up the mount before it was basically more of a cleaning and replacing the gooped up grease inside the mount. This time through I am going to upgrade the worm gear bearings and the main RA bearing. Not sure I have a good reason as to why I am replacing the bearings other than the age and the quality of the OEM bearings. It’s already torn apart, the bearings are pretty inexpensive, the old bearings do not owe me anything, so I might as well upgrade them while I am in there (that is how I am justifying it anyway).
Here are the new parts I ordered for the tune up (for each mount):
- Worm Gear Bearings: 4 x TRB RC 6mm x 13mm x 5mm Ceramic Ball Bearings
2 for the RA and 2 for the DEC - RA Bearing: 1 x 6007ZZ Nachi Bearing 35mm x 62mm x 14mm
- Grease: Super Lube-21030 Synthetic Multi-Purpose Grease a little bit goes a long way.
- 0.5mm thick PTFE Sheet to cut spacers/washers to replace the nylon washers – found on eBay
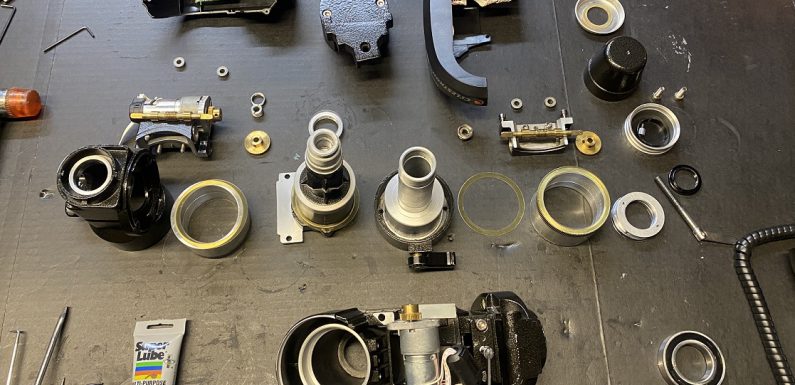
I disassembled the mount. It’s not really that hard to take a part. I removed the electronics first (note the direction of the connections, if you hook it up backwards you will let the magic smoke out), then disassembled the RA Axis, then the DEC axis. The important thing with disassembly is organization, keeping the different assemblies together and documenting how things will go back together. Pay attention to the locations of the nylon washers and the direction of the worm gears. Also keep the parts for the DEC and the RA axis separated, the worm gears and ring gears are different and not interchangeable between them. Even if you didn’t document things if you keep the assemblies and the associated parts organized it is not that difficult to figure out how things go back together.
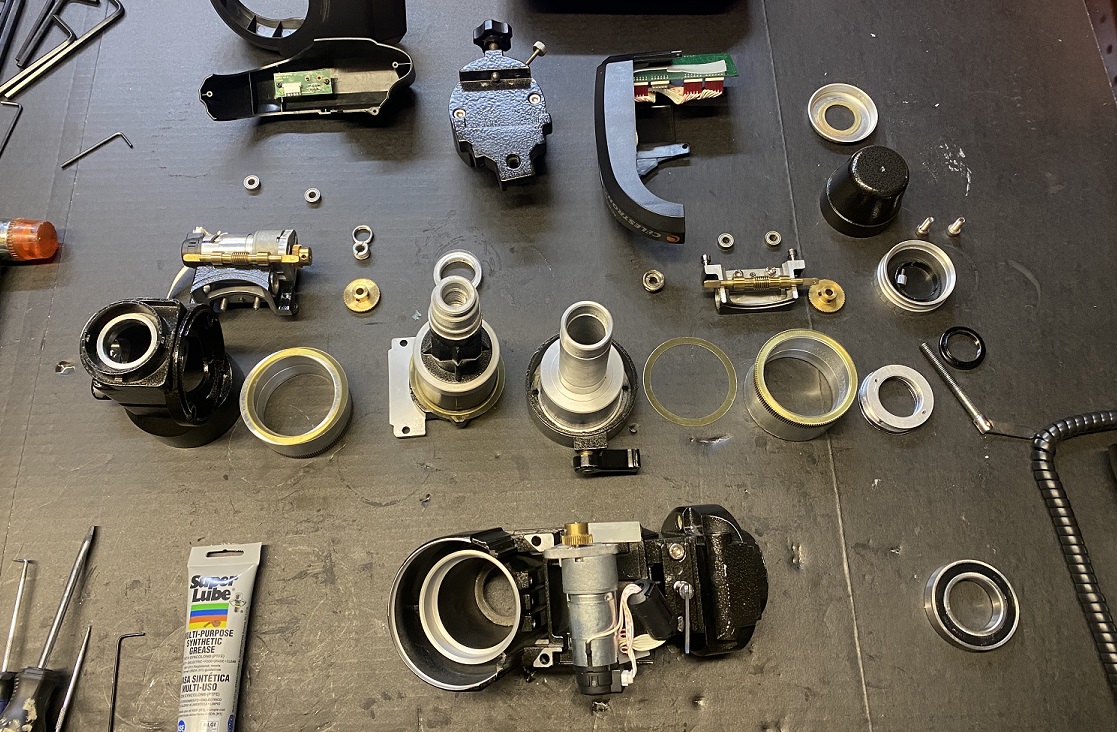
Once the mount was completely disassembled I cleaned all the old grease off everything. Checked all the metal to metal and metal to nylon washer contact areas for burrs and rough spots. I did not polish things but if I found a rough spot I used some fine emery paper and a scotch-brite pad to try to buff it out.
There are 5 large nylon spacers/washers in the mount, 2 on the DEC axis and 3 on the RA axis, and a couple of them are pretty rough (burred on the edges, rough spots on the surface). These are .5 mm thick with an outer diameter of 74mm and the inner diameter of 62mm. I cut new large spacers from the PTFE sheet I picked up on eBay using a compass cutter.
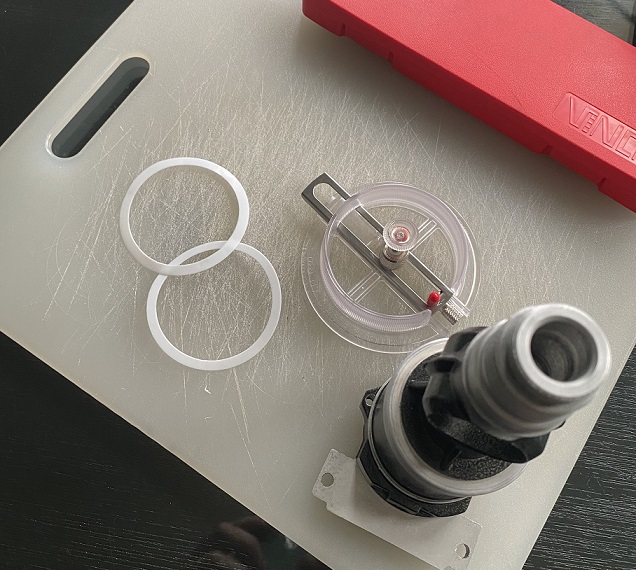
There are 3 smaller nylon spacers on the DEC axis. These are .3mm thick two with an outer diameter of 36mm and an inside diameter of 28mm and one with a outer diameter of 40mm and an inner diameter of 30mm. I cut new ones for these out of the .5mm sheet as well. These have no impact on the alignment or spacing, they only provide a smooth surface. There was enough thread that these fit just fine even though they are a hair thicker.
First I reassembled the DEC axis using the new PTFE spacers and applying a thin coat of grease on all the metal to metal and metal to spacer areas. The retaining nut on the end of the axis needs to be tightened so there is no play in the axis but the axis still turns free and smooth. Once tightened there are two set screws to keep it in place.
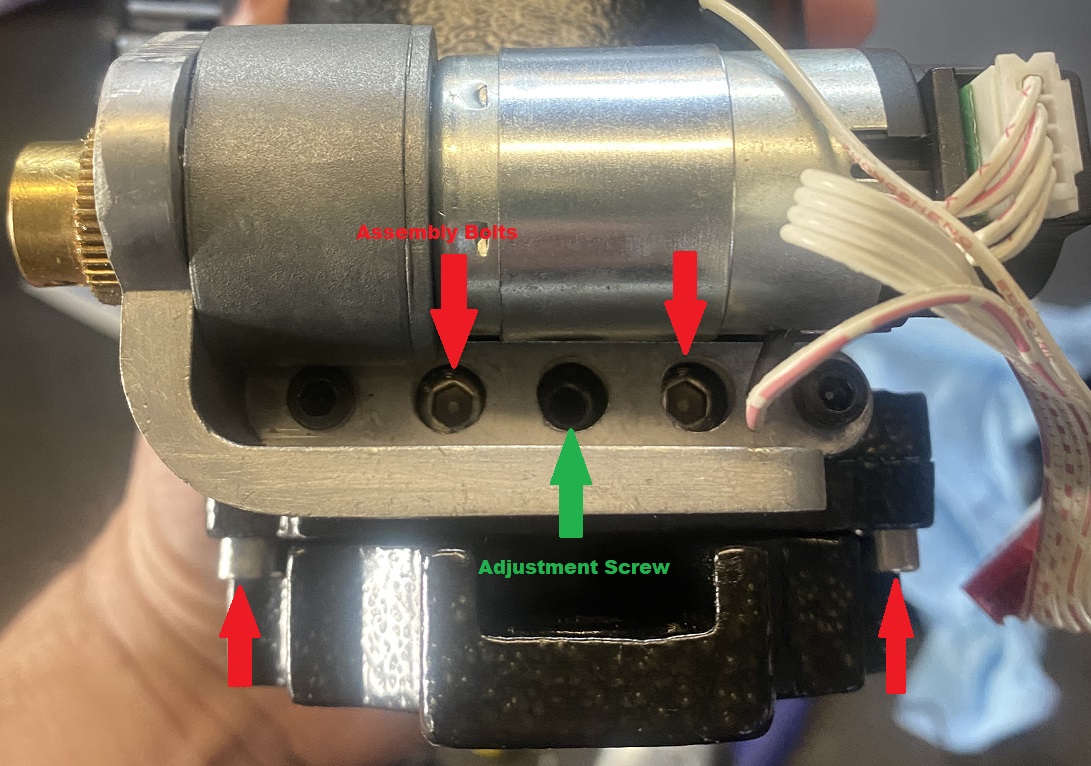
Installed the new DEC worm gear bearings and adjusted the preload on them. There is a threaded retainer for the worm gear and a locking nut. Tighten the threaded retainer until there is no side by side play, then tighten the locking nut. Check that the worm gear rotates smoothly with no binding or side to side play. There is a delicate balance between too tight and too lose, takes a bit of fiddling to get it right.
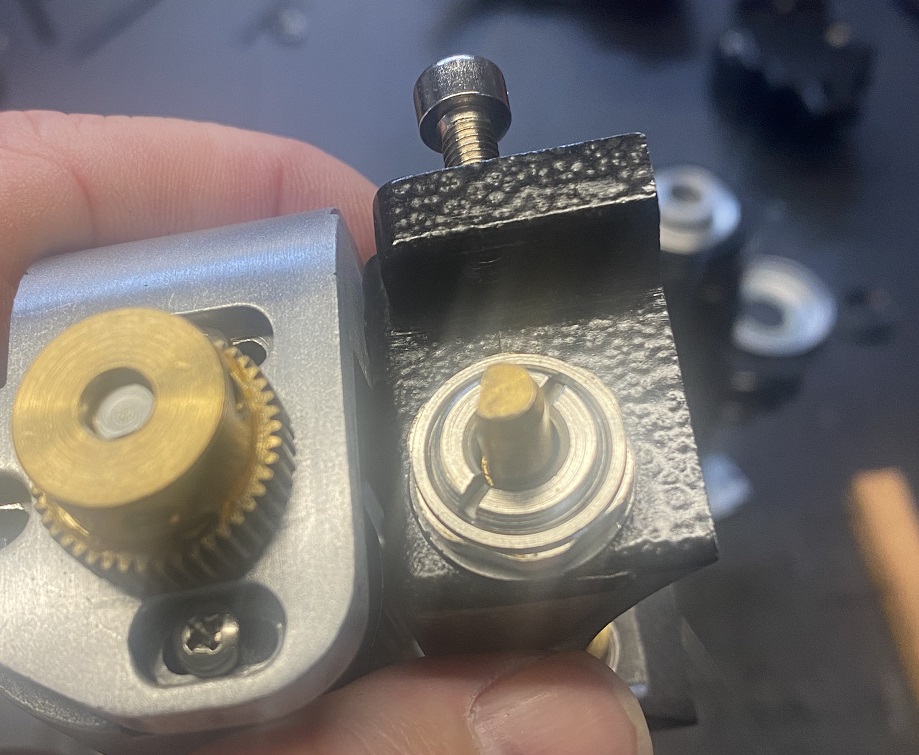
Reinstalled the worm gear assembly on the DEC and adjusted the tension on the ring gear. There is an adjustment grub screw that you turn in (right) to loosen the mesh or turn out (left) to tighten the mesh. The bolts which hold the assembly in place (there are 4 of them) have to be loosened to make adjustments. When making adjustments to the grub screw loosen the assembly bolts, make a small (like 1/8th turns) adjustment, then tighten the bolts back up and check the worm gear alignment. The worm gear should mesh with the ring gear and turn smooth with no slop, or backlash, when changing directions.
Once the DEC axis was reassembled I moved on to the RA axis. Replaced and adjusted the worm gear bearings. Also replaced the large RA bearing.
I replaced all the nylon spacers with the PTFE spacers and all the metal to metal and metal to spacer areas were given a thin coat of grease. Then reassembled the RA axis. Reinstalled the worm gear assemblies and adjusted them (same process as with the DEC axis worm gear).
Reinstalled the motor control electronics and covers making sure to connect up the motors correctly. These connections are not keyed so make sure the pins are lined up and the direction is correct (document this when you disassemble). Hooking things up wrong can cause bad, expensive, things to happen.
With it all put back together I powered it up on the bench and tested the action by slewing the mount with hand controller. Really freshened up this decade+ old mount. Moves nice and smooth on both the RA axis and the DEC axis, no slop, binding, or dragging. The motors are still loud, but not much can be done about that. I think the worm gear adjustment and replacing the nylon spacers with the PTFE spacers I cut made a big difference in the smoothness of the mount.
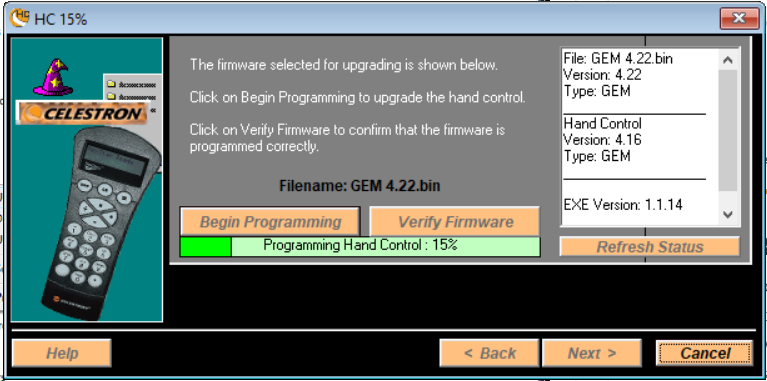
While I had it on the bench I decided to check for a firmware upgrade. The process and the bits for upgrading the Hand Controller and the Motor Controller can be found here.
This is an older NexStar Hand Controller so the new Celestron Firmware Manager does not work for it. I had to use the Celestron HC Update utility, which will not run on Windows 10/11 unless you set the compatibility mode to Windows 7.
Same with the Celestron MC Update utility.

Both the hand controller firmware and motor controller firmware have been updated to the most recent (2019) available: Verion 4.22 for the hand controller and version 5.2 for the motor controller.
Now to repeat the process on the other mount. Need to machine a second set of azimuth adjustment knobs as well.
Hope you found this information useful. If you are looking to freshen up your old Celestron Advanced GT CG5 mount it can definitely be worth taking the time to do it. Even if you are not going to replace the bearings, replacing the nylon washers, adjusting the worm gears, and a fresh thin coat of grease can significantly improve the operation of the mount. If you have any questions or tips just leave them down in the comments. Thanks!


Hi. Nice info for reviving this mount. Did you get the results expected with phd2 guiding? Do you use an axillary port adapter or the hand controller.
Thank you for this post!
I’m also interested in a “before and after” RMS guiding results for the load you carry on it. I have a C8, just bought the Hyperstar lens for it and have a CG5-GT needed a tune up! Thanks in advance
I bought a second-hand Advanced GT – which didn’t work. I am building my own drive electronics. Does anyone know what the operating voltage of the DC motors? Better still the model/type so I can see a data sheet.
Greeting from the UK!