Exploring the Suffolk Virginia Night Sky – Astronomy, Astrophotography, Telescopes, EAA – Planets and Stars and Nebula and Galaxies – Looking, Learning, Sharing… Let's see what we can see…
Several years ago I had set up a Raspberry Pi to allow me to control the telescope using Stellarium and image through the Raspberry Pi’s camera. I was tinkering with some EAA before EAA was EAA. It was completely self-contained in a case, replaced an 1 1/4″ eyepiece with the Raspberry Pi’s camera, and could be operated remotely. I still have the AstroPi I put together but a lot of things have changed so I built an updated one.
In this post I’ll walk through what I did to get Astroberry Server (and other Astronomy software) installed on a Raspberry Pi 4, to set up the virtualgps with my location information, and to set up and test KStars/Ekos to control my mount and camera.
Setting up the Raspberry Pi and Installing the Software
I picked up this CanaKit Raspberry Pi 4 8GB kit which comes with a Raspberry Pi 4 and everything you need (and then some) to get it up and running (128 GB SD card, case, heat sinks, fan, power supply, HDMI cables, etc).
The SD Card with the kit is preloaded with NOOBs but I want to use the AstroBerry. So I grabbed the Astroberry image from here and reimaged the SD Card. Installed the newly imaged SD Card into the Raspberry Pi and booted it up. Followed the initial wizard to set locale, time zone, and such. Then set up the Wifi to connect to my home network. The default user in Astroberry is astroberry and the default password is astroberry. I changed the default password for the astroberry user and configured VNC to use Unix username and password (by default it is set up to authenticate with just a password). Note that changing the VNC authentication method breaks the NoVNC web portal in Astroberry, just use a VNC client instead.
I can now run the Raspberry Pi headless (without a monitor/keyboard/mouse) and connect to it from my laptop or desktop using VNC. This Raspberry Pi 4 is WAY faster than the old Pi 2 which I had used originally for the AstroPi.
AstroDMx is not one of the imaging programs include with Astroberry. I have been messing with AstroDMx on Windows and there is a package for the Raspberry Pi so I downloaded and installed it.
wget https://www.astrodmx-capture.org.uk/sites/downloads/astrodmx/current/rpi/astrodmx-glibc-2.28_1.3.16.0_armhf.deb

sudo dpkg -i astrodmx-glibc-2.28_1.3.16.0_armhf.deb
May or may not use AstroDMx, but it is there if I want it.
I also installed Stellarium which is a free opensource planetarium program which I have used in the past and am familiar with the set up for controlling my Celestron CG5 mount.
sudo apt install stellarium
I may or may not use Stellarium but since I am familiar with it, it’s there if I want to use it.
After everything is installed I ran apt to update the Raspberry Pi to make sure everything is up to date:
sudo apt update

sudo apt upgrade

sudo apt dist-upgrade

sudo reboot
All the software I need/want (for now) is installed and up to date, so now on to setting up the virtualgps to provide location and time data for the Astroberry software.
Setting up virtualgps
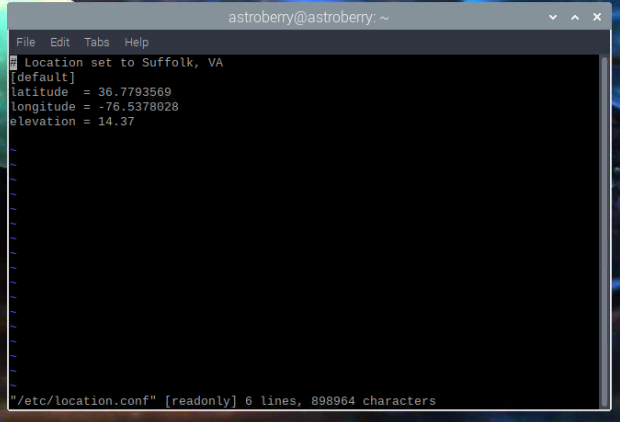
Astroberry includes a virtualgps and you set your location information (longitude, latitude, elevation) in a file /etc/location.conf. GPSD then uses the virtualgps to update KStars with the location information. I plan to set up an inexpensive GPS module to use actual GPS data so I don’t have to update the location.conf if I set up somewhere different, but for now I am going to use the virtualgps.
I edited the /etc/location.conf and added my longitude, latitude, and elevation.
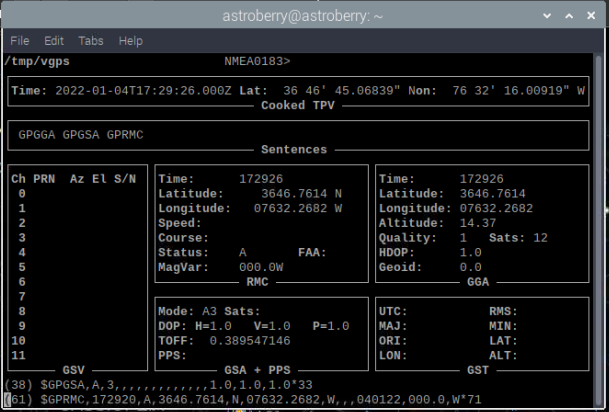
Restarted virtualgps and gpsd, then ran gpsmon to make sure the location information was updating from the virtualgps.
sudo systemctl restart virtualgps

sudo systemctl restart gpsd

gpsmon
On to the fun stuff… getting telescope and camera control working.
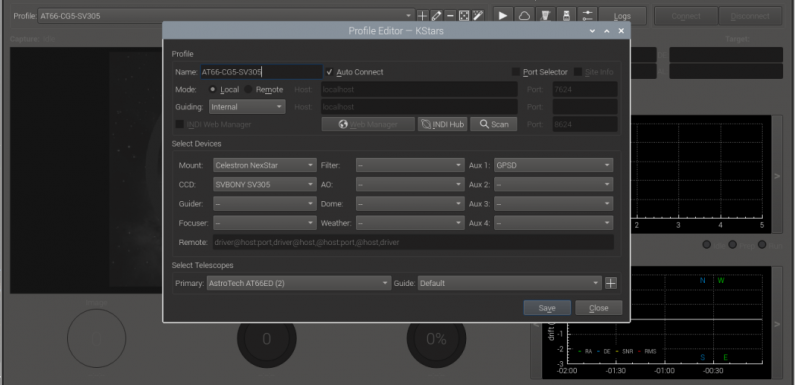
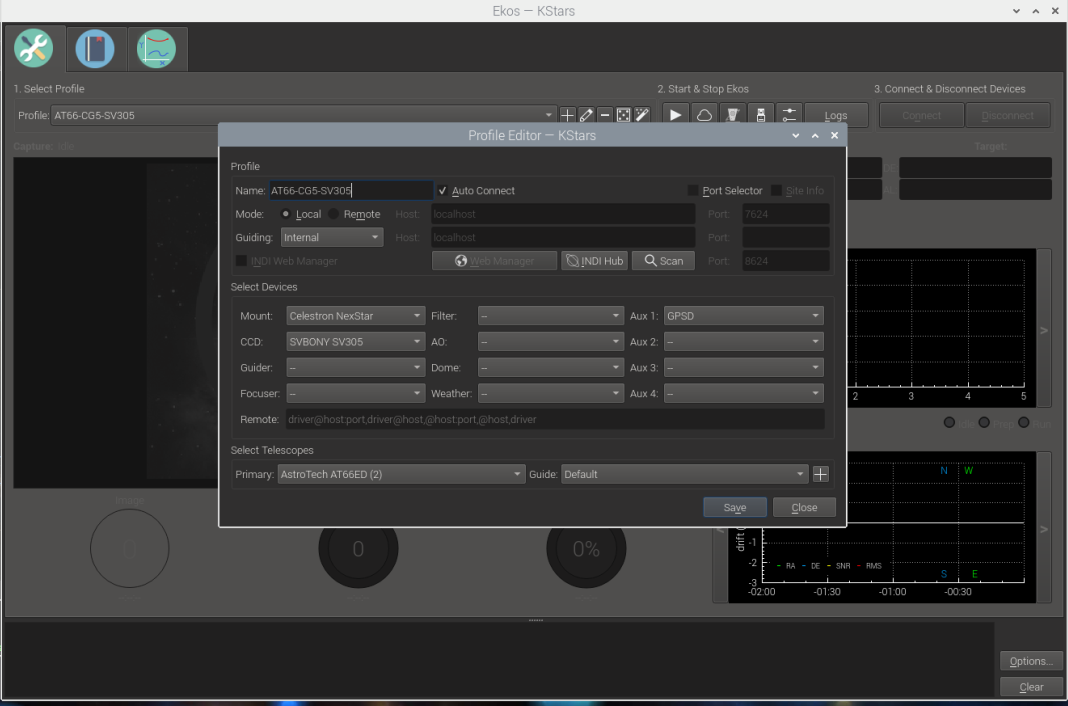
Configuring KStars/Ekos
Astroberry Server includes KStars/Ekos for observation planning and remote control of the mount and cameras. KStars is freely licensed, open source, cross-platform Astronomy Software. KStars includes Ekos which allows you to control equipment (mount, camera, filter wheels, focusers, guiders, etc) using the INDI Library.
Launch KStars from the icon on the Astroberry’s task bar. After launching KStars the first run wizard runs and I configured my location and verified the time was correct. This is just to get things started, I’ll be using GPSD for location data which I’ll configure in the Ekos profile. I launched Ekos from the KStars toolbar to create a new profile for my mount, camera, scope, and GPS.
I created profiles for each of my scopes with the Celestron NexStar mount, SVBONY SV305 Camera, and GPSD. The profile shown above is for the AT66ED as the primary scope, which is the one I will likely use most.
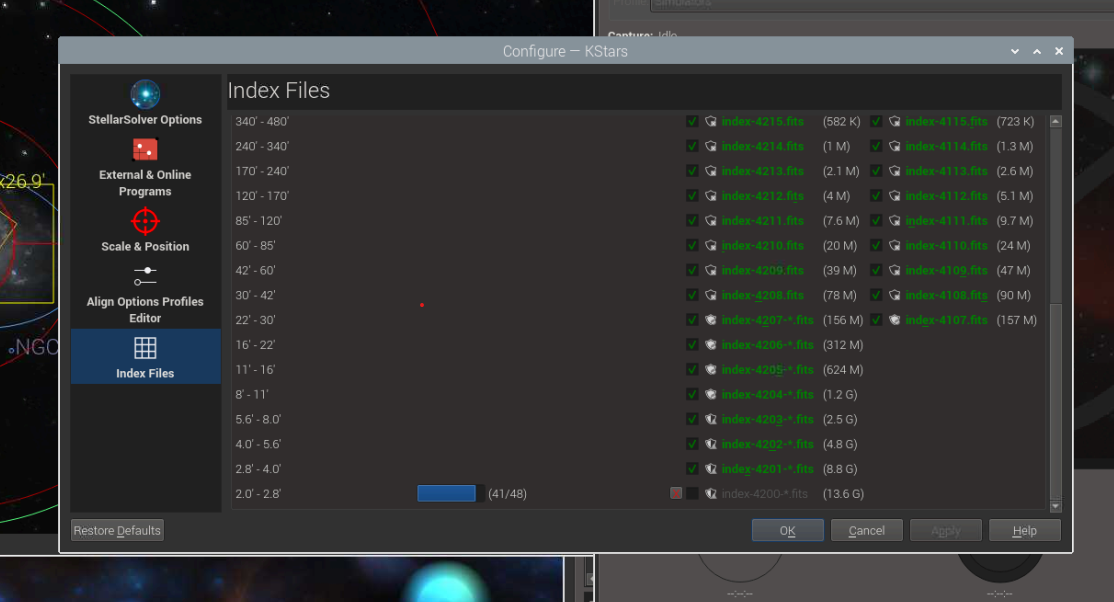
I did some testing with the Ekos Simulators Profile for plate solving and polar alignment to get familiar with the processes. For plate solving to work the index files need to be downloaded. I downloaded the index files for Ekos plate solving.
The index files are marked as required, recommended, and optional. I loaded them all up. This is multiple-gigs of FITS files, so it took some time.
With KStars and Ekos configured I am ready to try it out for reals… just need a clear sky.
First light!
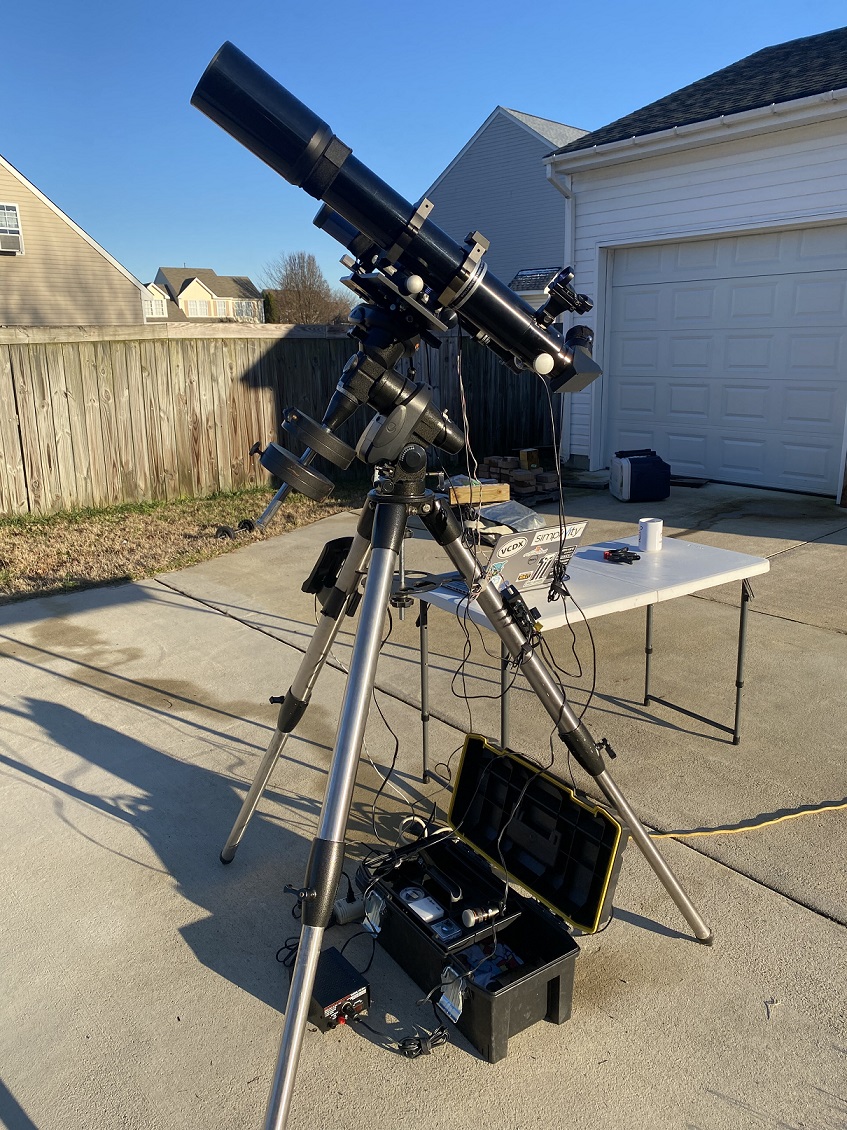
Up until now everything was done on my desk, now to connect the Raspberry Pi up to the mount and camera to see what I can get it to do.
Connected a USB to serial cable to one of the Raspberry Pi’s USB ports and connected up the hand controller serial connection. Some of the newer mounts have a direct USB connection for this, but mine is older so the USB to Serial to Hand Controller RS232 cable is required. Then I connected my SV305 Camera to a another free USB port on the Raspberry Pi.
Powered on the Raspberry Pi and made sure I could connect to it with VNC from my laptop and waited for it to get dark.
Launched KStars and from the KStars toolbar I launched Ekos. In Ekos I selected the Profile I had created for the AT66ED with the SV305 Camera, started the profile, and the INDI control panel launched and I made sure the mount, camera, and GPSD connected.
That’s a quick capture of Jupiter in the picture above. I slewed to Jupiter using the Hand Controller and used Jupiter to make sure I was in focus.
One of the things I noticed immediately when I went to set up the hand controller is that the hand controller’s time was set to the correct time. That’s was a good sign since it is getting this from the INDI connection as it does not have an internal real-time clock.
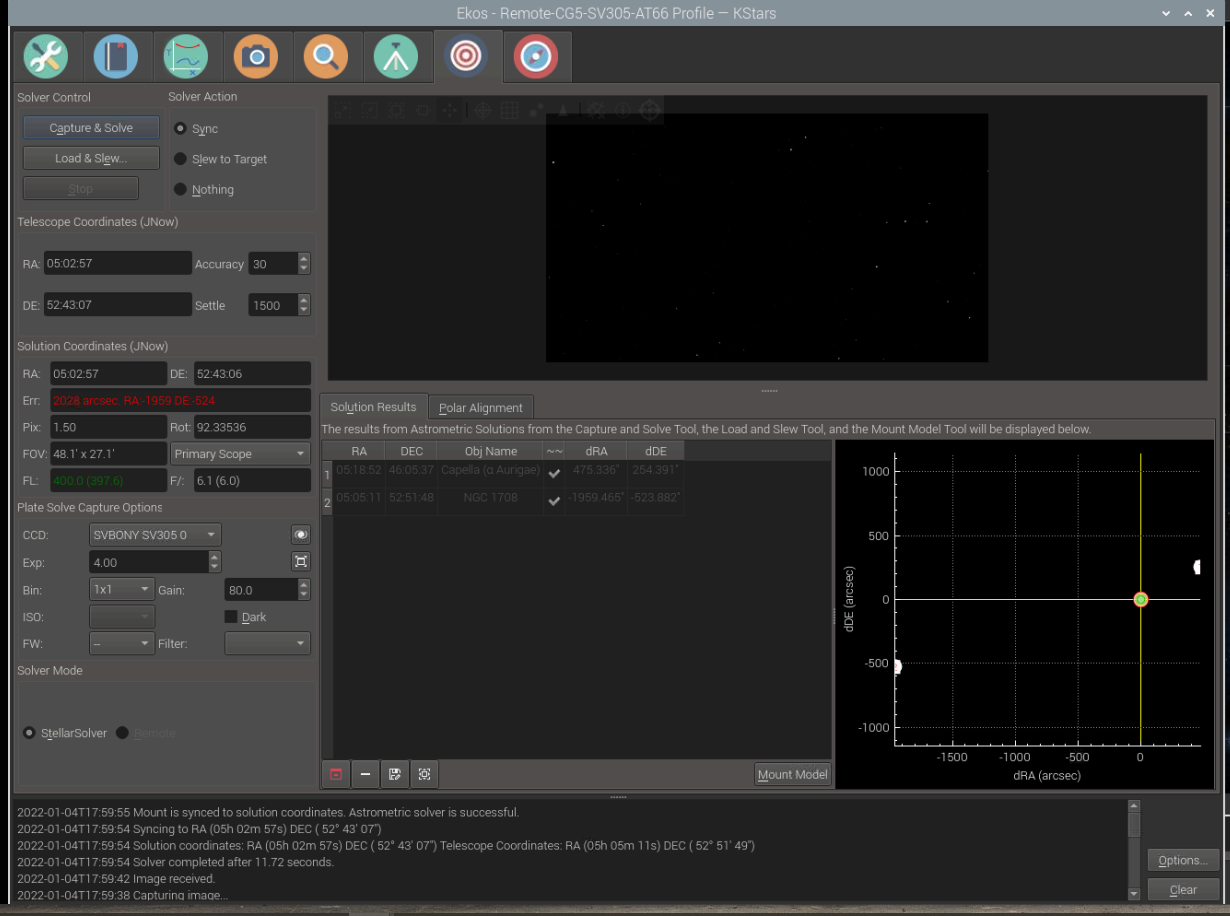
With the connections up in Ekos, I selected an object, the bright star Capella, in KStars. Right clicked on it, selected my scope, and clicked Goto. The scope slewed to Capella. Huzzah! KStars/Ekos/INDI is in fact communicating with the mount.
Now to try plate solving… On the Ekos toolbar select the Align icon. I changed the Solver Action to Sync and then clicked Capture & Solve.
I did not do any alignment of the scope. It is roughly polar aligned, I just ran the quick align to initialize the hand controller after powering it up. The plate solving in Ekos got me on target usually with in 2 moves. I would select an object in Kstars, right click and Goto it with the scope. After it slewed I ran Capture & Solve with the sync action and it would show me slightly off where I wanted to be. Selected the object again and Goto, when the slew finished I ran the Capture & Solve again and it had me dead on.
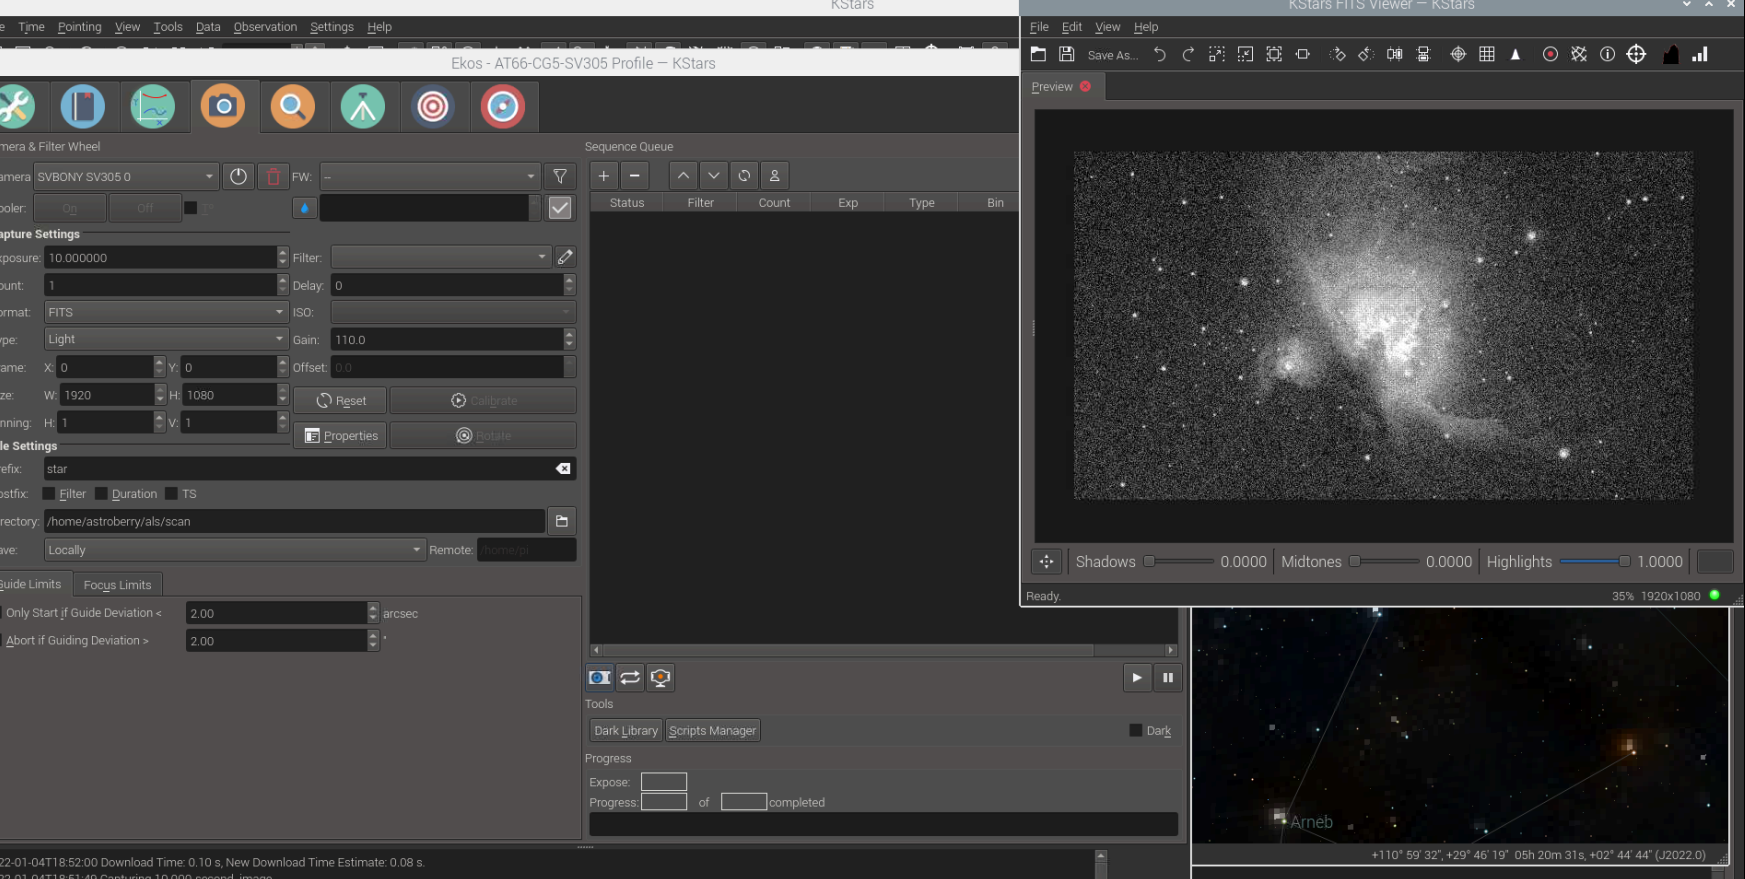
Here is a screen capture of M42 in Orion after using this Capture & Solve method:
Once I get the polar alignment dialed in this will probably be spot on.
My Astroberry Raspberry Pi is ready for some EAA!!!
What’s Next
I have the basics working. Telescope mount control, camera control, and I am getting more familiar with KStars. Here is my list of things to do (keep an eye out for future post):
Set up the GPS module to get actual real-time location data instead of using the virtualgps
Using the KStars Polar Alignment tool to get a better polar alignment
Using a remote profile with the INDI Web Interface to access my scope and cameras from KStars running on my desktop.
Tinker with the INDI Hub to control the scope and cameras from KStars anywhere. Maybe even let some of my friends access the equipment.
Auto Guiding with my Atik or Orion SSAG Camera and Guide Scope
Cool little project (well I think it’s cool anyway). Looking forward to expanding on it and getting it dialed in. Will be nice to observe from the warmth of my living room.
If you have any questions about this or any of the steps, or if you have any tips or tricks for Astroberry/KStars/Ekos, please post them in the comments below.
20 thoughts on “Setting Up a Raspberry Pi for EAA…”
I see from the picture that you are powering the Raspberry Pi from AC via an extension cord, using the supply that came with your CanaKit. Do you know if there are any rechargeable power supplies that can power the Raspberry via DC? I would want to have that type of setup as I frequently drag my scope in my car to a viewing site. Such a supply could also power the telescope.
You could definitely do a portable power supply, just make sure it is 5 volt to the Raspberry Pi. Most telescope accessories want 12 volts, if you run 12 volts to the Raspberry Pi you will likely let the magic smoke out of it.
Hey, finally received my CanaKit Raspberry Pi today (supply chain issues, couldn’t get one since late March). Once I get a little more kit (like a female-female VGA-HDMI adaptor, micro-sd adaptor), I may be ready to start going with this. Thanks for your help and this great guide.
I was looking at your suggestion above about connecting the Raspberry Pi to the hand control port on the scope. I notice that you use two cables, one a RJ-22 to DB9 and another go connect DB9 to USB. This seemed a little clunky and I wondered if an RJ-22 to USB direct connector was available. I came across this https://www.amazon.com/TLS2200-Printer-CP2102-Adapter-Programming/dp/B082R45LHH which looks like it might fill the bill but I’m not sure if the end-to-end wire connections are the same as in your setup. Do you have any thoughts on this?
Steve, It looks like that cable has the USB to Serial built in. Since it is essentially just USB to RS232 I am guessing it would probably work and simplify things a bit. I recently picked up a Nexstar+ hand controller which allows me to go direct USB to the hand controller. The USB to serial conversion is done in the hand controller. For < $20 that cable might be worth a try if you have the RS232 port on the hand controller.
Thanks
Hersey
Thanks, Hersey.
I have, since this last message, gotten very careful about not overcabling. My Raspberry Pi from CanaKit came with a MicroHDMI-HDMI cable. I bought a HDMI-VGA cable (female-female, not many of those around) too hook into that and spent a day trying everything to get the darned thing to work – it just wouldn’t. Finally I just junked CanaKit’s cable and bought me a MicroHDMI-VGA cable and it worked out of the box, even through my KVM switch. In fact, I’m typing this on my Raspberry Pi right now since my laptop is in the shop – it’s my only computer at the moment! This is running under Astroberry, got that installed.
So, yeah, think I will try to strive for as few cables as possible.
Okay, noob learning time now. Really NOOB. Sorry, in advance I’m rushing a bit, to see if I can get the hang of this equipment in time for Sunday’s lunar eclipse, weather permitting.
So, I don’t yet have telescope control, that cable should arrive tomorrow. I have the scope set up (in broad daylight) pointing to a local landmark. I can see the landmark through an eyepiece. I take the eyepiece out and replace it with my new SVBONY SV305, in the eyepiece slot. I hook the cable to a USB port to my Raspberry PI, on which Astroberry is running. Using the web browser method to connect to the Pi (http://astroberry.local/desktop/), I can see and run astroberry. Yay! I define an EKOS profile containing ONLY the Camera. Profile defined, I start it, and it connects to the camera successfully. What I am expecting is that somewhere in the User Interface, there is a screen showing me a view of the local landmark. I see nothing like that. In what window should I expect to see the live view of what the telescope is pointing at? What am I not doing or doing wrong?
Think I found what I was looking for. I can sort of see what I’m pointing at, but it is dark now. So many parameters to play with. I think I’m going to like this. Is there any tutorial material on using KStars/Ekos?
I don’t think that cable I got is any good.
When I plug it into the Aux port on my scope with the hand control plugged in, it complains: “No response 17: Invalid Model”. If I detach the hand control and just plug the cable connected to the scope (Either in hand control port or aux port) it doesn’t show up as connected on the Raspberry Pi.
So I would not want anyone else to waste time and money trying https://www.amazon.com/TLS2200-Printer-CP2102-Adapter-Programming/dp/B082R45LHH as I suggested above. Instead I will order the cables that you used. Won’t be ready to capture the eclipse tomorrow. 🙁
Sigh. Getting nowhere with controlling the Celestron mount.
I’ve tried two different cabling options with it and my Raspberry Pi:
The first (https://www.amazon.com/TLS2200-Printer-CP2102-Adapter-Programming/dp/B082R45LHH) was totally worthless. It didn’t even show up as a device on the Raspberry Pi.
The second, your original suggestion of a combination of the USB to Serial Cable and Serial to Hand Controller cables does show up as a device, but fails with
2022-05-16T01:57:01: [ERROR] Serial read error: Timeout error
This occurs whether I connect to the mount’s handset port or aux port.
Not sure what to try next.
Connect everything up and then power the mount on. Then start the indi-server with the camera and mount in the profile. In Ekos create the profile with the camera and mount connecting through the indi-server. Then start the profile. Does the mount and camera connect?
Been through a lot of learning since my last post. See https://www.cloudynights.com/topic/824174-cannot-connect-raspberry-pi-serial-port-to-celestron-4se-handset-or-aux-jacks/ .Most of my problems were due to my own confusion, my failing to realize that there were THREE, not two ports on the scope. The port on the mount where the handset plugs in normally, the AUX port on the mount and then there is also a port on the handset that I never noticed. That is where you have to plug in. When I plugged in there, I could connect to the scope. Connecting to the camera was easy.
They should name these ports better, something like Mount-HC Port, Mount-AUX Port, HC Port. Still, I like the idea of using the Mount ports. Apparently you need a different cable for that (Celestron 93922), and the INDI AUX driver.
Too bad I hadn’t gotten all this figured out in time for the lunar eclipse last weekend.
Hey, is it possible to embed links in replies on your website? If so, how?
Also, sometimes your captcha doesn’t work. I think if you make a typo, it doesn’t recover, even if you get it right the second time.
Feeling a little bummed. It seems like I’m in a Catch-22 situation with my equipment and astroberry. The only thing my Celestron NexStar 4se is reasonably good for is planetary imaging. But astroberry offers no planetary imaging solution that is compatible with my Svbony 305 camera. See https://github.com/rkaczorek/astroberry-server/issues/187, which I just posted. I’ve been using CCDCiel on the Pi, which is roughly in the same space as KStars, not really optimized for viewing planets. I’ve made a few captures with it, about on the level of your Jupiter capture above.
Hersey – are you still using Astroberry? I find that there are no updates to it. It seems the author has lost interest. The Raspberry Pi OS has had a 64-bit version since February, yet I see nothing about an upgrade that would accommodate this, which might be very interesting. Also FireCapture in astroberry doesn’t work. I like the basic idea of astroberry, but I may start looking for alternatives.
I’ve basically taken the summer off from observing, as I was planning a move from Evanston, IL to Tucson AZ, which offers much better observing conditions. This move is now complete and I’m able to observe from my backyard, which is a nice convenience. I am mostly sticking to planetary observation for now, which is why FireCapture becomes an issue. I’ve been using CCDCiel which has issues and is really not designed for planetary observing. I may look at compiling FireCapture myself outside of Astroberry and seeing if I can get it to run.
I am still using Astroberry. Astroberry itself may not be updated but the packages which make up the build are regularly updated. Recently KStars/Ekos/INDI were all updated on the Astroberry Repo. Just run the sudo apt update and sudo apt upgrade to upgrade packages from the repos. When you say FireCapture does not work, what do you mean? Does it not run? Is there some kind of error? I don’t use FireCapture but I will have a look and see if I have any issues. Congrats on the move.
Hersey:
You recommend the Astroberry Repo. Thanks, I may get the latest stuff from there. I had initially started using CCDCiel/HNSKY (also INDI-based) instead of Kstars/Ekos. I may give KStars a second look. I like some things about CCDCiel but it has its problems too. I like HNSKY.
As to FireCapture, I think that the version supplied with Astroberry flat out doesn’t work, but additionally, even if it did, they have no intention of supporting my camera, the Svbony-305. All their effort seems to be directed at the 64-bit platforms, which won’t help me until Astroberry is updated to run on that platform. I’ve even messaged the FireCapture developers and they confirm that, which is visible at http://www.firecapture.de/
Hmmm. I don’t remember what made me abandon your KStars/Ekos path six months ago. Something did, though, and I got sucked into the alternative combination CCDCiel/HNSKY. So, now, reaching the frustration point with that combo. I decide to give KStars/Ekos another try. I should have done this from the start. From what I can see from your post, it has a feature that is only promised with CCDCiel – ability to make small tweaks to the scope slew.
However, now comes the first question. With my Celestron NexStar 4se, I must always align the scope first before connecting. This is a bit of a pain. I think this is an INDI requirement, but I might be wrong; maybe it is a CCDCiel requirement. However, I notice that in your article above, you don’t mention this step. How is it that you can avoid this step? How can you tell your scope to find Jupiter if it isn’t aligned? Or is your scope pre-aligned equatorially? I can’t do that with the 4se. Not in any easy way.
First step in trying to get this set up as you have done is the gps stuff.
I edit my location in location.conf (Not sure how it uses elevation but should this be in feet or meters?).
Then I run the three commands you recommend:
sudo systemctl restart virtualgps
sudo systemctl restart gpsd
gpsmon
but when I run gpsmon, instead of the display you get, I get this:
Something is wrong, but I don’t know what it might be. Do you?
I tried to use Ekos. It seemed like I had my devices set up (mount, camera, but not virtual gps) yet I couldn’t see what to do with it. It seemed like I could set up “sequences” but I could not find the command to simply capture (or preview) whatever the scope was looking at. And slewing was not happening. Are there good tutorials for Ekos somewhere? All that I could find presumed you were using Stellarmate.


I see from the picture that you are powering the Raspberry Pi from AC via an extension cord, using the supply that came with your CanaKit. Do you know if there are any rechargeable power supplies that can power the Raspberry via DC? I would want to have that type of setup as I frequently drag my scope in my car to a viewing site. Such a supply could also power the telescope.
Never mind, figured it out, not an issue for me. I already have a power supply that can handle it.
You could definitely do a portable power supply, just make sure it is 5 volt to the Raspberry Pi. Most telescope accessories want 12 volts, if you run 12 volts to the Raspberry Pi you will likely let the magic smoke out of it.
Hey, finally received my CanaKit Raspberry Pi today (supply chain issues, couldn’t get one since late March). Once I get a little more kit (like a female-female VGA-HDMI adaptor, micro-sd adaptor), I may be ready to start going with this. Thanks for your help and this great guide.
I was looking at your suggestion above about connecting the Raspberry Pi to the hand control port on the scope. I notice that you use two cables, one a RJ-22 to DB9 and another go connect DB9 to USB. This seemed a little clunky and I wondered if an RJ-22 to USB direct connector was available. I came across this https://www.amazon.com/TLS2200-Printer-CP2102-Adapter-Programming/dp/B082R45LHH which looks like it might fill the bill but I’m not sure if the end-to-end wire connections are the same as in your setup. Do you have any thoughts on this?
Steve, It looks like that cable has the USB to Serial built in. Since it is essentially just USB to RS232 I am guessing it would probably work and simplify things a bit. I recently picked up a Nexstar+ hand controller which allows me to go direct USB to the hand controller. The USB to serial conversion is done in the hand controller. For < $20 that cable might be worth a try if you have the RS232 port on the hand controller. Thanks Hersey
Thanks, Hersey.
I have, since this last message, gotten very careful about not overcabling. My Raspberry Pi from CanaKit came with a MicroHDMI-HDMI cable. I bought a HDMI-VGA cable (female-female, not many of those around) too hook into that and spent a day trying everything to get the darned thing to work – it just wouldn’t. Finally I just junked CanaKit’s cable and bought me a MicroHDMI-VGA cable and it worked out of the box, even through my KVM switch. In fact, I’m typing this on my Raspberry Pi right now since my laptop is in the shop – it’s my only computer at the moment! This is running under Astroberry, got that installed.
So, yeah, think I will try to strive for as few cables as possible.
Now to buy a little telescope stuff, camera, etc.
Okay, noob learning time now. Really NOOB. Sorry, in advance I’m rushing a bit, to see if I can get the hang of this equipment in time for Sunday’s lunar eclipse, weather permitting.
So, I don’t yet have telescope control, that cable should arrive tomorrow. I have the scope set up (in broad daylight) pointing to a local landmark. I can see the landmark through an eyepiece. I take the eyepiece out and replace it with my new SVBONY SV305, in the eyepiece slot. I hook the cable to a USB port to my Raspberry PI, on which Astroberry is running. Using the web browser method to connect to the Pi (http://astroberry.local/desktop/), I can see and run astroberry. Yay! I define an EKOS profile containing ONLY the Camera. Profile defined, I start it, and it connects to the camera successfully. What I am expecting is that somewhere in the User Interface, there is a screen showing me a view of the local landmark. I see nothing like that. In what window should I expect to see the live view of what the telescope is pointing at? What am I not doing or doing wrong?
Thanks in advance.
Think I found what I was looking for. I can sort of see what I’m pointing at, but it is dark now. So many parameters to play with. I think I’m going to like this. Is there any tutorial material on using KStars/Ekos?
I don’t think that cable I got is any good.
When I plug it into the Aux port on my scope with the hand control plugged in, it complains: “No response 17: Invalid Model”. If I detach the hand control and just plug the cable connected to the scope (Either in hand control port or aux port) it doesn’t show up as connected on the Raspberry Pi.
So I would not want anyone else to waste time and money trying https://www.amazon.com/TLS2200-Printer-CP2102-Adapter-Programming/dp/B082R45LHH as I suggested above. Instead I will order the cables that you used. Won’t be ready to capture the eclipse tomorrow. 🙁
Sigh. Getting nowhere with controlling the Celestron mount.
I’ve tried two different cabling options with it and my Raspberry Pi:
The first (https://www.amazon.com/TLS2200-Printer-CP2102-Adapter-Programming/dp/B082R45LHH) was totally worthless. It didn’t even show up as a device on the Raspberry Pi.
The second, your original suggestion of a combination of the USB to Serial Cable and Serial to Hand Controller cables does show up as a device, but fails with
2022-05-16T01:57:01: [ERROR] Serial read error: Timeout error
This occurs whether I connect to the mount’s handset port or aux port.
Not sure what to try next.
Steve,
Connect everything up and then power the mount on. Then start the indi-server with the camera and mount in the profile. In Ekos create the profile with the camera and mount connecting through the indi-server. Then start the profile. Does the mount and camera connect?
Hersey
Been through a lot of learning since my last post. See https://www.cloudynights.com/topic/824174-cannot-connect-raspberry-pi-serial-port-to-celestron-4se-handset-or-aux-jacks/ .Most of my problems were due to my own confusion, my failing to realize that there were THREE, not two ports on the scope. The port on the mount where the handset plugs in normally, the AUX port on the mount and then there is also a port on the handset that I never noticed. That is where you have to plug in. When I plugged in there, I could connect to the scope. Connecting to the camera was easy.
They should name these ports better, something like Mount-HC Port, Mount-AUX Port, HC Port. Still, I like the idea of using the Mount ports. Apparently you need a different cable for that (Celestron 93922), and the INDI AUX driver.
Too bad I hadn’t gotten all this figured out in time for the lunar eclipse last weekend.
Hey, is it possible to embed links in replies on your website? If so, how?
Also, sometimes your captcha doesn’t work. I think if you make a typo, it doesn’t recover, even if you get it right the second time.
Feeling a little bummed. It seems like I’m in a Catch-22 situation with my equipment and astroberry. The only thing my Celestron NexStar 4se is reasonably good for is planetary imaging. But astroberry offers no planetary imaging solution that is compatible with my Svbony 305 camera. See https://github.com/rkaczorek/astroberry-server/issues/187, which I just posted. I’ve been using CCDCiel on the Pi, which is roughly in the same space as KStars, not really optimized for viewing planets. I’ve made a few captures with it, about on the level of your Jupiter capture above.
Oh well …
Hersey – are you still using Astroberry? I find that there are no updates to it. It seems the author has lost interest. The Raspberry Pi OS has had a 64-bit version since February, yet I see nothing about an upgrade that would accommodate this, which might be very interesting. Also FireCapture in astroberry doesn’t work. I like the basic idea of astroberry, but I may start looking for alternatives.
I’ve basically taken the summer off from observing, as I was planning a move from Evanston, IL to Tucson AZ, which offers much better observing conditions. This move is now complete and I’m able to observe from my backyard, which is a nice convenience. I am mostly sticking to planetary observation for now, which is why FireCapture becomes an issue. I’ve been using CCDCiel which has issues and is really not designed for planetary observing. I may look at compiling FireCapture myself outside of Astroberry and seeing if I can get it to run.
Steve,
I am still using Astroberry. Astroberry itself may not be updated but the packages which make up the build are regularly updated. Recently KStars/Ekos/INDI were all updated on the Astroberry Repo. Just run the sudo apt update and sudo apt upgrade to upgrade packages from the repos. When you say FireCapture does not work, what do you mean? Does it not run? Is there some kind of error? I don’t use FireCapture but I will have a look and see if I have any issues. Congrats on the move.
Hersey:
You recommend the Astroberry Repo. Thanks, I may get the latest stuff from there. I had initially started using CCDCiel/HNSKY (also INDI-based) instead of Kstars/Ekos. I may give KStars a second look. I like some things about CCDCiel but it has its problems too. I like HNSKY.
As to FireCapture, I think that the version supplied with Astroberry flat out doesn’t work, but additionally, even if it did, they have no intention of supporting my camera, the Svbony-305. All their effort seems to be directed at the 64-bit platforms, which won’t help me until Astroberry is updated to run on that platform. I’ve even messaged the FireCapture developers and they confirm that, which is visible at http://www.firecapture.de/
Hmmm. I don’t remember what made me abandon your KStars/Ekos path six months ago. Something did, though, and I got sucked into the alternative combination CCDCiel/HNSKY. So, now, reaching the frustration point with that combo. I decide to give KStars/Ekos another try. I should have done this from the start. From what I can see from your post, it has a feature that is only promised with CCDCiel – ability to make small tweaks to the scope slew.
However, now comes the first question. With my Celestron NexStar 4se, I must always align the scope first before connecting. This is a bit of a pain. I think this is an INDI requirement, but I might be wrong; maybe it is a CCDCiel requirement. However, I notice that in your article above, you don’t mention this step. How is it that you can avoid this step? How can you tell your scope to find Jupiter if it isn’t aligned? Or is your scope pre-aligned equatorially? I can’t do that with the 4se. Not in any easy way.
First step in trying to get this set up as you have done is the gps stuff.
I edit my location in location.conf (Not sure how it uses elevation but should this be in feet or meters?).
Then I run the three commands you recommend:
sudo systemctl restart virtualgps
sudo systemctl restart gpsd
gpsmon
but when I run gpsmon, instead of the display you get, I get this:
tcp://localhost:2947 JSON slave driver>
(82) {“class”:”VERSION”,”release”:”3.17″,”rev”:”3.17″,”proto_major”:3,”proto_minor”:12}
(32) {“class”:”DEVICES”,”devices”:[]}
Something is wrong, but I don’t know what it might be. Do you?
I tried to use Ekos. It seemed like I had my devices set up (mount, camera, but not virtual gps) yet I couldn’t see what to do with it. It seemed like I could set up “sequences” but I could not find the command to simply capture (or preview) whatever the scope was looking at. And slewing was not happening. Are there good tutorials for Ekos somewhere? All that I could find presumed you were using Stellarmate.
I think my problem with the virtual gps was the command
sudo systemctl restart virtualgps
Elsewhere on the astroberry wiki the command is given as
sudo systemctl restart virtualgps.service
When I did this, now I get the display.